Spring Boot 자동설정, 스타터, fat jar 동작 원리

지금까지 당연하게 넘긴 것들이 있습니다. 1편에서 내장 Tomcat이 알아서 떴고, 3편에서 DispatcherServlet이 알아서 등록됐으며, 2편에서 @Service/@Repository가 알아서 빈으로 스캔됐습니다. 이걸 누가 했는지는 한 번도 따지지 않았습니다.
답은 Spring Boot의 auto-configuration(자동설정) 입니다. Series 1의 마지막 편인 이번 글은 그 “마법”을 해체하고, 앱이 어떻게 패키징되고 실행되는지(fat jar)까지 마무리합니다.
TL;DR
@SpringBootApplication=@SpringBootConfiguration+@EnableAutoConfiguration+@ComponentScan의 합성이다.- auto-configuration은 클래스패스에 있는 jar를 보고 합리적 기본 빈을 구성하되, 내가 직접 빈을 정의하면 자동설정 조건이 어긋나 그 빈을 만들지 않는다(condition이 back off).
- 스타터는 “이 기능에 필요한 의존성 묶음”이고, 그걸 넣으면 클래스패스가 채워져 자동설정 조건이 발동한다.
- 실행 산출물은 executable(fat) jar: 내 코드 + 의존성 + 로더를 하나로 묶어
java -jar로 단일 프로세스 실행된다.
1. 1~3편의 “마법”은 누가 해줬나
지금까지 우리가 설정하지 않았는데 동작한 것들:
- 내장 Tomcat 기동 (1편)
- DispatcherServlet 등록 +
/매핑 (1/3편) @Service/@Repository빈 스캔 (2편)
이걸 가능하게 한 게 @SpringBootApplication 한 줄입니다. 그 안을 봅니다.
2. @SpringBootApplication = 3개 어노테이션의 합
모든 Boot 앱의 시작점인 이 어노테이션은 사실 셋의 합성입니다.
A single
@SpringBootApplicationannotation can be used to enable those three features, that is:@EnableAutoConfiguration…@ComponentScan…@SpringBootConfiguration…
1
2
3
4
5
6
7
8
9
@SpringBootApplication
//  = @SpringBootConfiguration  (= @Configuration 의 Boot 특수화, 설정 소스)
//  + @ComponentScan            (내 @Component/@Service/... 스캔 - 2편)
//  + @EnableAutoConfiguration  (자동설정 켜기 - 이번 편의 핵심)
public class MyApplication {
    public static void main(String[] args) {
        SpringApplication.run(MyApplication.class, args);
    }
}
@ComponentScan은 2편에서 본 “내가 짠 빈 찾기”이고, 핵심은 @EnableAutoConfiguration입니다.
3. auto-configuration: 클래스패스 기반 + 양보
자동설정의 원리는 두 문장으로 요약됩니다.
Spring Boot auto-configuration attempts to automatically configure your Spring application based on the jar dependencies that you have added.
즉 클래스패스에 어떤 jar가 있는지 보고 알맞은 기본 빈을 구성합니다. 그리고 결정적으로,
Auto-configuration is non-invasive. At any point, you can start to define your own configuration to replace specific parts of the auto-configuration. For example, if you add your own
DataSourcebean, the default embedded database support backs away.
위 문서가 쓴 표현은 “backs away”지만, Spring Boot 내부에서 이 동작을 가리키는 정식 용어는 back off입니다. 자동설정 클래스에 붙은 조건(condition)이 어긋나면 그 빈을 만들지 않고 물러나며, 그래서 “기본은 알아서, 필요하면 내가 덮어쓰기”가 성립합니다.
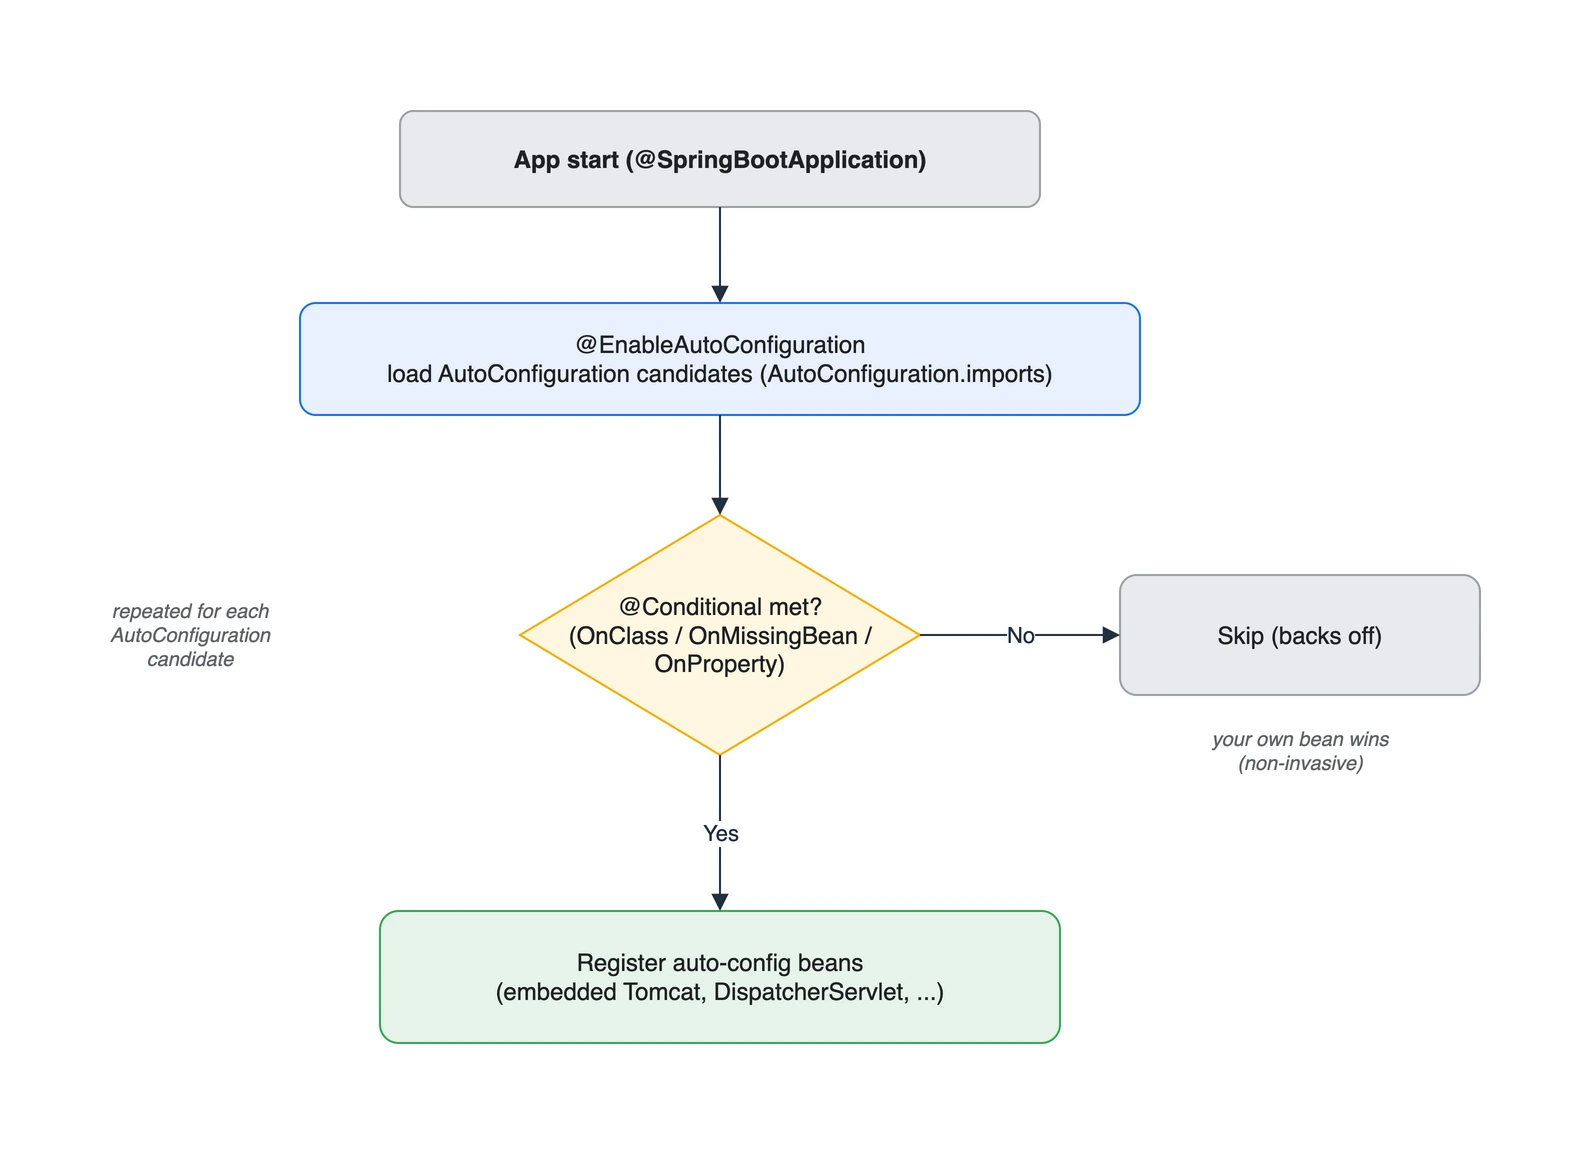 후보 로드 -> @Conditional 평가 -> 통과 시 빈 등록, 아니면 condition이 back off
이 “켜고 끄기”의 구현 메커니즘이 @Conditional 계열입니다. 문서가 정리한 대표 패턴은 이렇습니다.
Usually, auto-configuration classes use
@ConditionalOnClassand@ConditionalOnMissingBeanannotations. This ensures that auto-configuration applies only when relevant classes are found and when you have not declared your own@Configuration.
세 가지를 구분하면 메커니즘이 또렷해집니다.
@ConditionalOnClass- 클래스패스에 특정 클래스가 있을 때만 설정을 포함합니다. 문서 표현으로 “let@Configurationclasses be included based on the presence or absence of specific classes.” 스타터가 jar를 넣으면 이 조건이 true가 됩니다.@ConditionalOnMissingBean- 같은 타입의 빈을 내가 이미 등록하지 않았을 때만 기본 빈을 만듭니다. 문서는 “thesomeServicebean is going to be created if no bean of typeSomeServiceis already contained in theApplicationContext“라고 설명합니다. 이게 “내가 정의하면 자동설정이 back off”의 실제 구현입니다.@ConditionalOnProperty- 환경 프로퍼티 값에 따라 켜고 끕니다(“lets configuration be included based on a Spring Environment property”).
평가 순서에 함정이 하나 있습니다. @ConditionalOnMissingBean은 “지금까지 처리된” 빈 정의만 보고 판단하므로, 내 빈이 자동설정보다 먼저 등록되어야 자동설정이 비켜섭니다. 그래서 Spring Boot는 사용자 설정(@Configuration/@ComponentScan)을 먼저 적용하고 자동설정을 나중에 평가합니다. 문서 경고 그대로입니다.
You need to be very careful about the order in which bean definitions are added, as these conditions are evaluated based on what has been processed so far.
1편에서 확인한 ServletWebServerFactoryAutoConfiguration이 실제 예시입니다.
1
2
3
4
@AutoConfiguration
@ConditionalOnClass(ServletRequest.class)        // 서블릿 클래스가 클래스패스에 있을 때만
@ConditionalOnWebApplication(type = SERVLET)     // 서블릿 웹앱일 때만
public class ServletWebServerFactoryAutoConfiguration { ... }
서블릿이 클래스패스에 있으면 내장 서버를 구성하고, 내부 @Bean 메서드의 @ConditionalOnMissingBean이 “내가 만든 빈이 없을 때만” 기본 빈을 등록합니다.
그럼 Spring Boot는 후보 자동설정 클래스를 어디서 찾을까요? 각 jar 안의 고정 경로 파일입니다. 문서가 위치까지 못박았습니다.
Spring Boot checks for the presence of a
META-INF/spring/org.springframework.boot.autoconfigure.AutoConfiguration.importsfile within your published jar. The file should list your configuration classes, with one class name per line.
즉 .imports는 한 줄에 자동설정 클래스 FQN 하나씩 적은 평범한 텍스트 파일입니다. spring-boot-autoconfigure jar 안의 이 파일에는 ServletWebServerFactoryAutoConfiguration을 비롯한 후보가 줄줄이 들어 있습니다.
1
2
3
4
5
# META-INF/spring/org.springframework.boot.autoconfigure.AutoConfiguration.imports (발췌)
org.springframework.boot.autoconfigure.web.servlet.ServletWebServerFactoryAutoConfiguration
org.springframework.boot.autoconfigure.jdbc.DataSourceAutoConfiguration
org.springframework.boot.autoconfigure.jackson.JacksonAutoConfiguration
...
로딩 시점은 @EnableAutoConfiguration이 import하는 selector가 기동 초기에 이 파일들을 전부 읽어 후보 목록을 만든 뒤, 위에서 본 @Conditional 평가를 클래스마다 돌리는 순간입니다. 조건을 통과한 클래스만 빈을 등록하고, 나머지는 back off합니다. 그래서 의존성을 안 넣은 기능은 후보로만 있다가 조용히 빠집니다.
원치 않는 후보를 명시적으로 끌 수도 있습니다.
1
2
@SpringBootApplication(exclude = { DataSourceAutoConfiguration.class })
public class MyApplication { ... }
4. 스타터: 큐레이션된 의존성 묶음
그럼 “클래스패스에 Tomcat이 있나?”의 클래스패스는 누가 채울까요? 스타터입니다.
Starters are a set of convenient dependency descriptors that you can include in your application. You get a one-stop shop for all the Spring and related technologies that you need …
spring-boot-starter-web- Starter for building web, including RESTful, applications using Spring MVC. Uses Tomcat as the default embedded container.
즉 spring-boot-starter-web 하나를 넣으면 Spring MVC + 내장 Tomcat + JSON 라이브러리가 클래스패스에 깔리고, 그러면 3장의 @ConditionalOnClass들이 발동해 웹앱이 “그냥 됩니다”. 버전은 Spring Boot가 관리하므로 내가 고르지 않습니다.
5. fat jar: 어떻게 단일 파일로 실행되나
1편에서 java -jar app.jar로 단일 프로세스가 뜬다고 했습니다. 그 jar가 executable(fat) jar입니다.
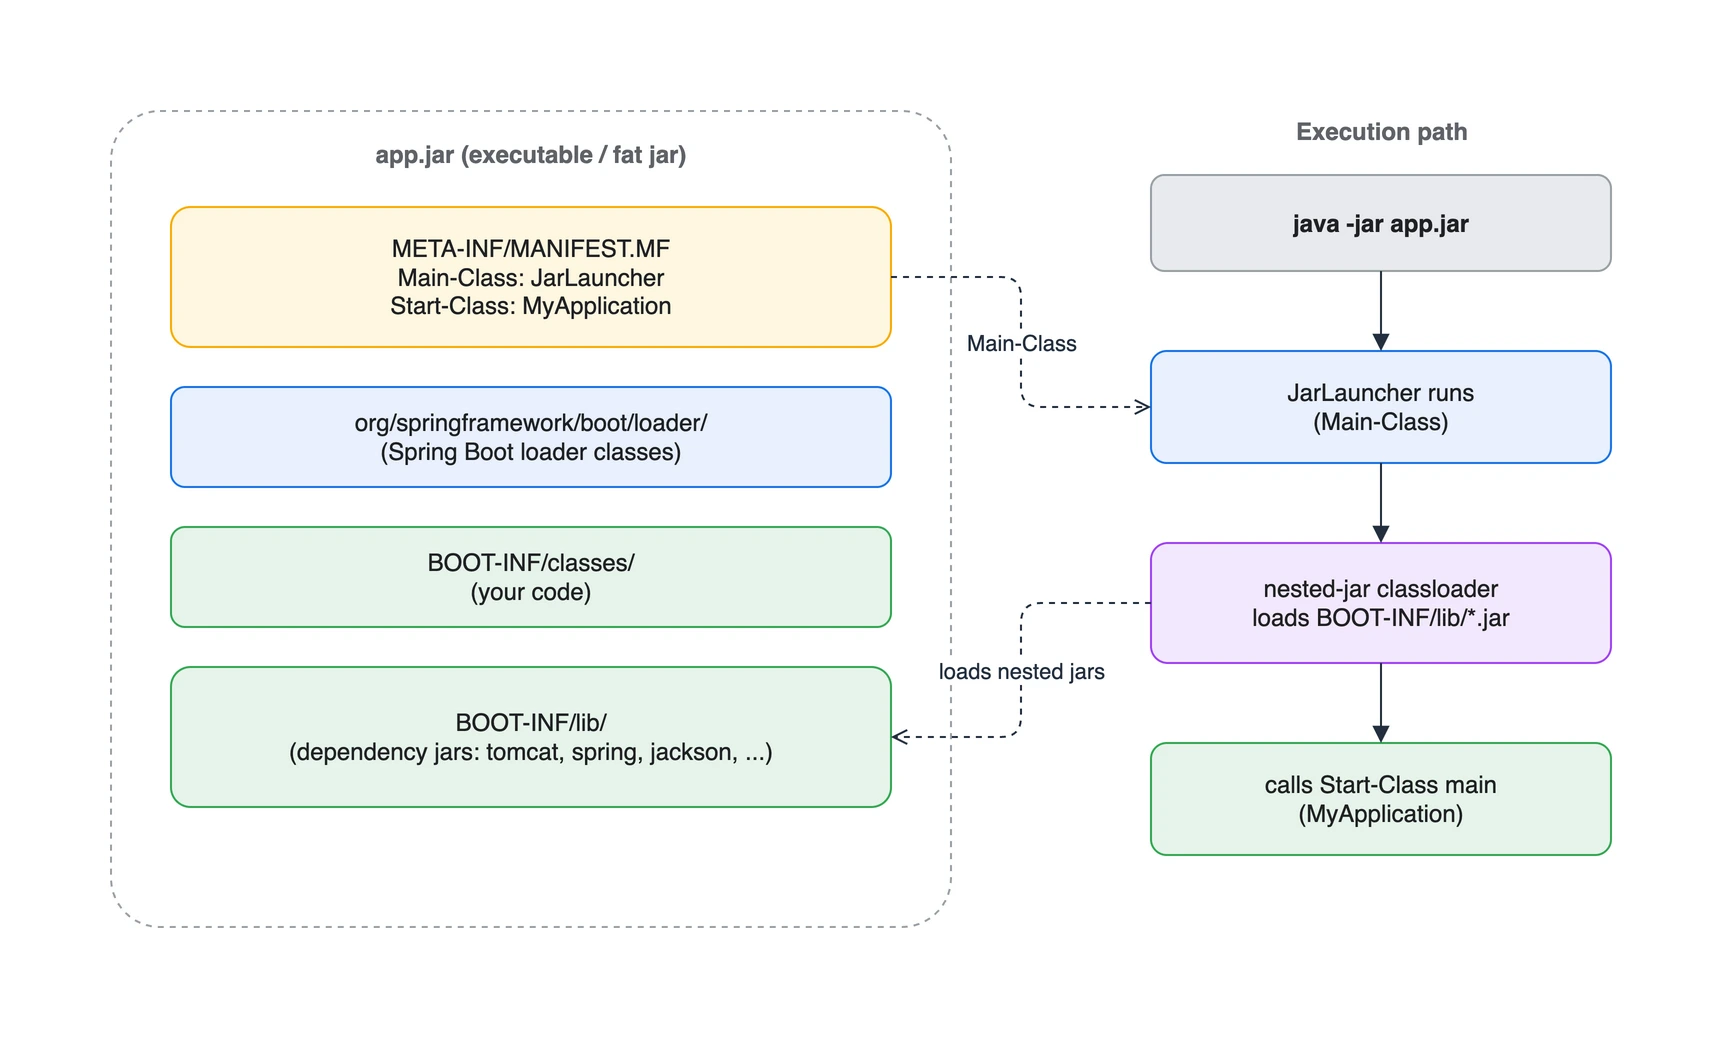 jar 내부 구조(좌)와 java -jar -> JarLauncher -> 중첩 classloader -> Start-Class main(우)
구조는 이렇습니다.
1
2
3
4
5
6
app.jar
├── META-INF/MANIFEST.MF        Main-Class: JarLauncher / Start-Class: MyApplication
├── org/springframework/boot/loader/   (Boot 로더 클래스)
└── BOOT-INF/
    ├── classes/   (내 코드)
    └── lib/       (의존성 jar들 - "jar 안의 jar")
여기서 핵심 문제와 해법:
Java does not provide any standard way to load nested jar files (that is, jar files that are themselves contained within a jar). This can be problematic if you need to distribute a self-contained application that can be run from the command line without unpacking.
표준 java -jar는 jar 안의 jar를 못 읽습니다. 그래서 Boot는 진짜 진입점을 내 클래스가 아니라 로더로 바꿔둡니다. 문서가 그 역할을 한 문장으로 정리합니다.
The
Launcherclass is a special bootstrap class that is used as an executable jar’s main entry point. It is the actualMain-Classin your jar file, and it is used to setup an appropriateClassLoaderand ultimately call yourmain()method.
MANIFEST를 보면 두 키가 분리돼 있습니다. Main-Class는 로더(서블릿 fat jar면 JarLauncher), Start-Class는 실제 내 애플리케이션 클래스입니다.
1
2
Main-Class:  org.springframework.boot.loader.launch.JarLauncher
Start-Class: com.example.MyApplication
JarLauncher는 세 로더 중 하나로, 문서 표현으로 “JarLauncher looks in BOOT-INF/lib/“를 담당합니다(WAR는 WarLauncher, 경로 커스터마이즈는 PropertiesLauncher). 동작 순서는 (1) java -jar가 JVM 기본 동작대로 Main-Class인 JarLauncher를 띄우고, (2) JarLauncher가 BOOT-INF/lib/ 안의 중첩 jar들을 읽는 전용 classloader를 세팅한 뒤, (3) Start-Class에 적힌 내 main()을 그 classloader 위에서 호출하는 것입니다. 그래서 빌드 시 Class-Path를 일일이 적을 필요가 없습니다.
You need not specify
Class-Pathentries in your manifest file. The classpath is deduced from the nested jars.
fat jar는 “내 코드 + 모든 의존성 + 로더”를 하나로 묶은 자체 완결 실행체입니다. JRE만 있으면 어디서든
java -jar로 돕니다.
6. 마무리: Series 1 정리
이번 편으로 Series 1을 닫습니다. 요청 한 건이 흐르는 길을 위에서 아래로 따라왔습니다.
- 1편: 요청이 단일 프로세스(내장 Tomcat) 안에서 DispatcherServlet을 거쳐 처리된다
- 2편: 그 안의 객체들은 IoC 컨테이너가 만든 싱글톤 빈이다
- 3편: 요청당 워커 스레드 1개가 블로킹 포함 전담하고, 그 스택은 native 메모리다
- 4편: 이 모든 걸 자동설정이 엮고, fat jar로 패키징해 실행한다
capstone 연결: fat jar -> 컨테이너 이미지(Series 2 / 5편 buildpack) -> 단일 프로세스 실행(1편) -> 그 프로세스 메모리를 buildpack memory calculator가 계산(capstone). 그리고 그 메모리 식의 항목들 - 힙(싱글톤 빈 baseline, 2편) / 스레드 스택(3편) / off-heap - 이 다음 시리즈의 주제입니다.
다음 시리즈(Series 2)에서는 한 계층 더 내려가, 까먹기 쉬운 메모리 CS 기초부터 다시 잡고 JVM 메모리 모델과 GC로 들어갑니다.
DevSecOps 관점에서 보면, auto-configuration은 Helm values의 합리적 기본값처럼 “convention over configuration”이고, @Conditional은 조건이 맞을 때만 리소스를 만드는 Terraform의 conditional과 닮았으며, fat jar는 정적 바이너리/컨테이너 이미지처럼 다 싸들고 다니는 자체 완결 산출물입니다.
7. 참고 자료
- Spring Boot Reference - Using the @SpringBootApplication Annotation: https://docs.spring.io/spring-boot/reference/using/using-the-springbootapplication-annotation.html
- Spring Boot Reference - Auto-configuration: https://docs.spring.io/spring-boot/reference/using/auto-configuration.html
- Spring Boot Reference - Build Systems (Starters): https://docs.spring.io/spring-boot/reference/using/build-systems.html
- Spring Boot - Executable Jar / Nested JARs: https://docs.spring.io/spring-boot/specification/executable-jar/nested-jars.html
- Spring Boot - Executable Jar / Launching Executable Jars: https://docs.spring.io/spring-boot/specification/executable-jar/launching.html
- Spring Boot Reference - Creating Your Own Auto-configuration: https://docs.spring.io/spring-boot/reference/features/developing-auto-configuration.html
궁금하신 점이나 추가해야 할 부분은 댓글이나 아래의 링크를 통해 문의해주세요.
Written with KKamJi