Istio Overview & Installation Guide

마이크로서비스가 늘어날수록 서비스 간 통신을 보안, 트래픽 제어, 관찰성 관점에서 일관되게 관리하기가 어려워집니다. 각 서비스에 라이브러리를 붙이는 방식은 확장될수록 유지보수 비용이 커지기 때문에, 네트워크 계층에서 공통 기능을 제공하는 서비스 메시(Service Mesh)가 필요합니다.
Istio는 대표적인 서비스 메시 플랫폼으로, 트래픽 제어부터 보안, 모니터링까지 표준화된 방식으로 제공합니다. 이번 글에서는 Istio의 개념과 설치 흐름, 그리고 Bookinfo 데모 배포까지의 내용을 다룹니다.
1. Istio란?
Istio는 마이크로서비스 환경에서 서비스 간 통신을 관리하고 보안을 강화하며 관찰성을 제공하는 오픈소스 서비스 메시 플랫폼입니다.
- 보안: mTLS 기반 서비스 간 암호화, 강력한 ID 기반 인증/인가
- 트래픽 관리: HTTP/gRPC/WebSocket/TCP에 대한 로드밸런싱 및 라우팅 제어
- 탄력성: 재시도, 실패 조치, 장애 주입(Fault Injection) 등 제어 정책
- 정책: 접근 제어, Rate Limit, Quota 등 정책 레이어 지원
- 관찰성: 서비스 간 모든 트래픽에 대한 메트릭, 로그, 추적 제공
2. 동작 구조 (Control Plane / Data Plane)
Istio는 크게 Control Plane과 Data Plane으로 구성됩니다.
- Data Plane: 각 서비스 옆의 프록시가 모든 트래픽을 가로채며 라우팅/보안/관찰 기능을 수행합니다.
- Control Plane: VirtualService, DestinationRule, Policy 등 구성 정보를 관리하고 Data Plane에 적용합니다.
이 구조 덕분에 애플리케이션 코드를 변경하지 않고도 공통 정책을 중앙에서 일관되게 운영할 수 있습니다.
3. Sidecar Mode vs Ambient Mode
Istio는 두 가지 데이터 플레인 모드를 제공합니다. 핵심 차이만 요약하면 다음과 같습니다.
| 구분 | Sidecar Mode | Ambient Mode |
|---|---|---|
| 프록시 배치 | Pod 옆에 Envoy sidecar 주입 | 노드 단 ztunnel(L4) + 필요 시 Namespace 단 Waypoint(L7 Envoy) |
| L7 처리 | 모든 Pod에서 L4/L7 처리 | L4는 ztunnel, L7은 Waypoint로 분리 |
| 적용/해제 | Sidecar 변경 시 Pod 재시작 필요 | 메시 적용/해제 시 Pod 재시작 없음 |
| 리소스 오버헤드 | Pod마다 Envoy 추가 | 공유 프록시로 오버헤드 감소 |
| 적합한 환경 | 고급 L7 제어가 필요한 복잡한 환경 | 운영 단순화/비용 효율을 중시하는 환경 |
4. 설치 흐름 (Makefile / istioctl)
4.1. Makefile 기반 설치 (추천)
1
2
3
4
5
6
7
8
9
10
11
12
13
14
15
16
17
18
git clone https://github.com/KKamJi98/kkamji-lab.git
cd kkamji-lab/study/istio-study/01-istio-overview/

# Init 모드 설치
make istio-install-init

# CNI 모드 설치 (ISTIO_OVERLAY_CNI=./istio-cni.yaml 기본값)
make istio-install-cni

# 설치 검증
make istio-verify

# 삭제 (CRD까지 삭제하려면 ISTIO_PURGE=true)
make istio-uninstall

# 모니터링 스택 (kube-prometheus-stack + Kiali)
make monitoring-install
make monitoring-delete
4.2. istioctl 기반 설치
1
2
3
istioctl install --set profile=default -y \
  --set values.pilot.resources.requests.cpu=250m \
  --set values.pilot.resources.requests.memory=512Mi
default: 실무용 기본 구성demo: 학습/테스트용 확장 구성minimal: 최소 구성
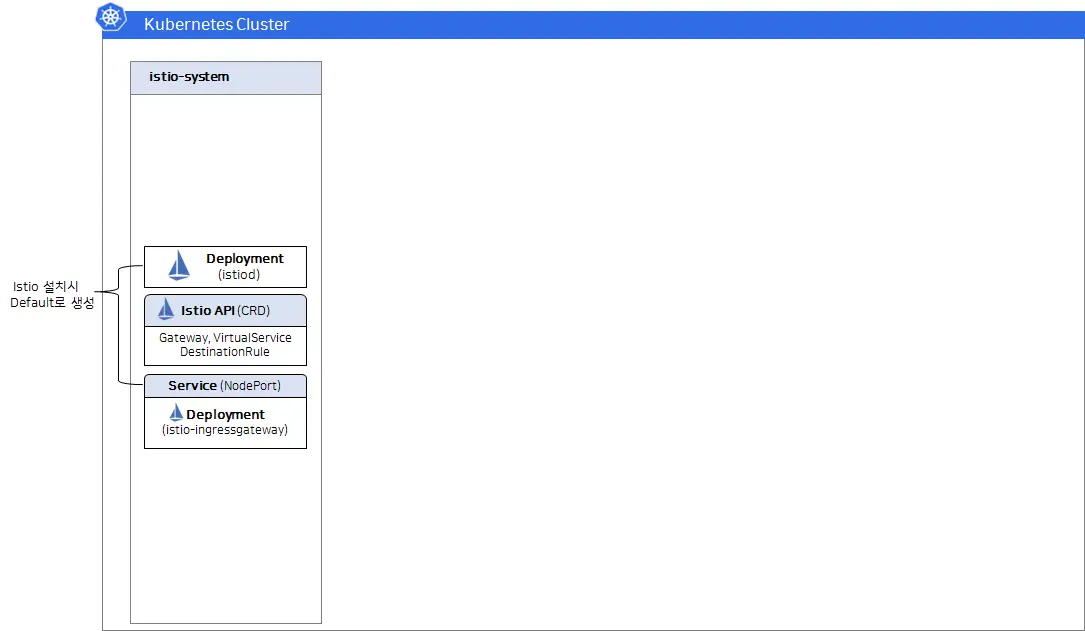
설치 확인
1
2
kubectl get deployments -n istio-system
kubectl get crd | rg istio
5. Bookinfo 데모 배포와 Sidecar 주입
1
2
3
4
5
6
7
8
9
10
11
# Bookinfo 배포 (Sidecar 미적용)
kubectl apply -f https://raw.githubusercontent.com/KKamJi98/kkamji-lab/main/study/istio-study/01-istio-overview/bookstore-app/bookinfo.yaml -n default

# Sidecar 자동 주입 활성화
kubectl label namespace default istio-injection=enabled

# 다시 배포 (Sidecar 적용)
kubectl apply -f https://raw.githubusercontent.com/KKamJi98/kkamji-lab/main/study/istio-study/01-istio-overview/bookstore-app/bookinfo.yaml -n default

# Pod 확인 (READY가 2/2인지 확인)
kubectl get pods -n default
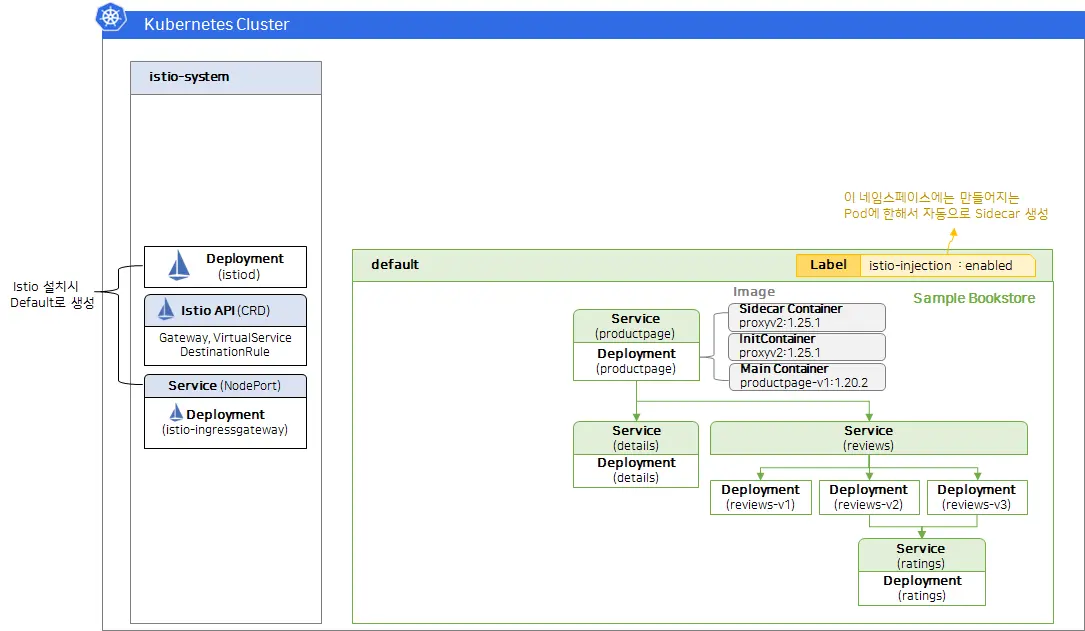
위 kubectl apply는 Bookinfo 샘플의 Service/ServiceAccount/Deployment를 생성합니다.
두 번째 apply는 Sidecar 자동 주입 라벨을 적용한 뒤 재배포하여 Envoy가 포함된 Pod를 생성합니다.
서비스 응답 확인
1
2
kubectl exec "$(kubectl get pod -l app=ratings -o jsonpath='{.items[0].metadata.name}')" \
  -c ratings -- curl -sS productpage:9080/productpage | rg "<title>"
6. Gateway API로 외부 노출
1
2
3
4
5
6
# Gateway/HTTPRoute 배포
kubectl apply -f https://raw.githubusercontent.com/KKamJi98/kkamji-lab/main/study/istio-study/01-istio-overview/gateway-api/bookinfo-gateway.yaml -n default

# 리소스 확인
kubectl get gateways.gateway.networking.k8s.io -n default
kubectl get httproutes.gateway.networking.k8s.io -n default
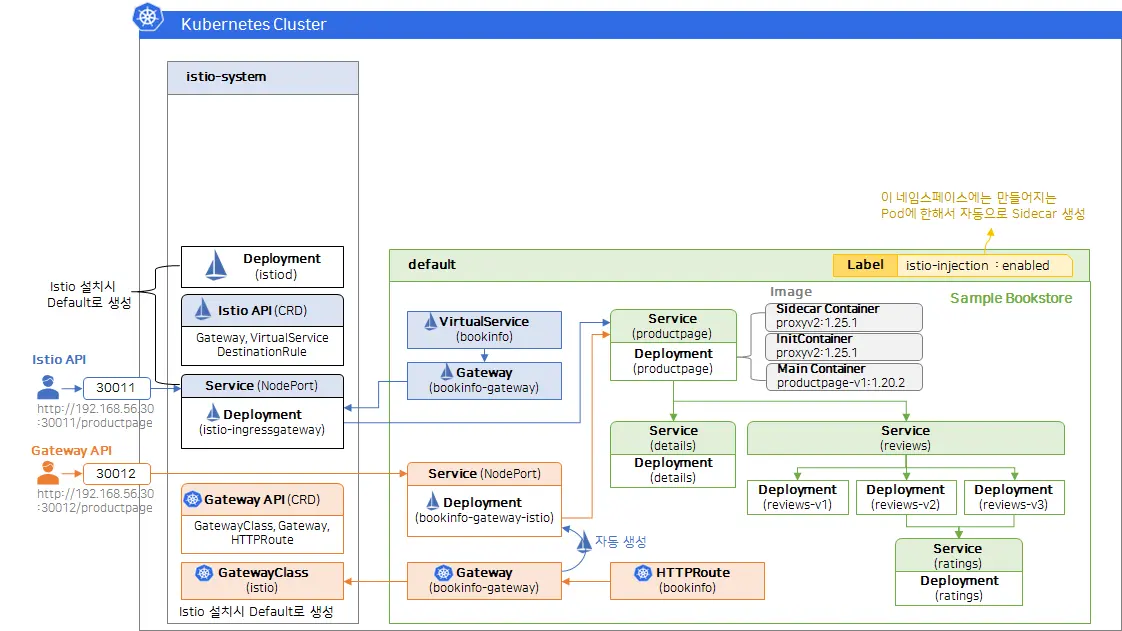
Gateway/HTTPRoute 리소스 적용 후 productpage가 외부에서 접근 가능한 상태임을 보여주는 화면입니다.
위 명령은 Gateway와 HTTPRoute 리소스를 생성하여 /productpage 경로를 외부로 노출합니다.
필요하다면 Service의 NodePort를 수정해 접근 포트를 명확히 지정할 수 있습니다.
1
2
3
4
5
kubectl edit svc bookinfo-gateway-istio -n default
# ports:
# - name: http
#   nodePort: 30020
#   port: 80
접속 예시 (환경에 맞게 IP 변경)
1
2
open http://<EXTERNAL-IP>:30010/productpage
open http://<EXTERNAL-IP>:30020/productpage
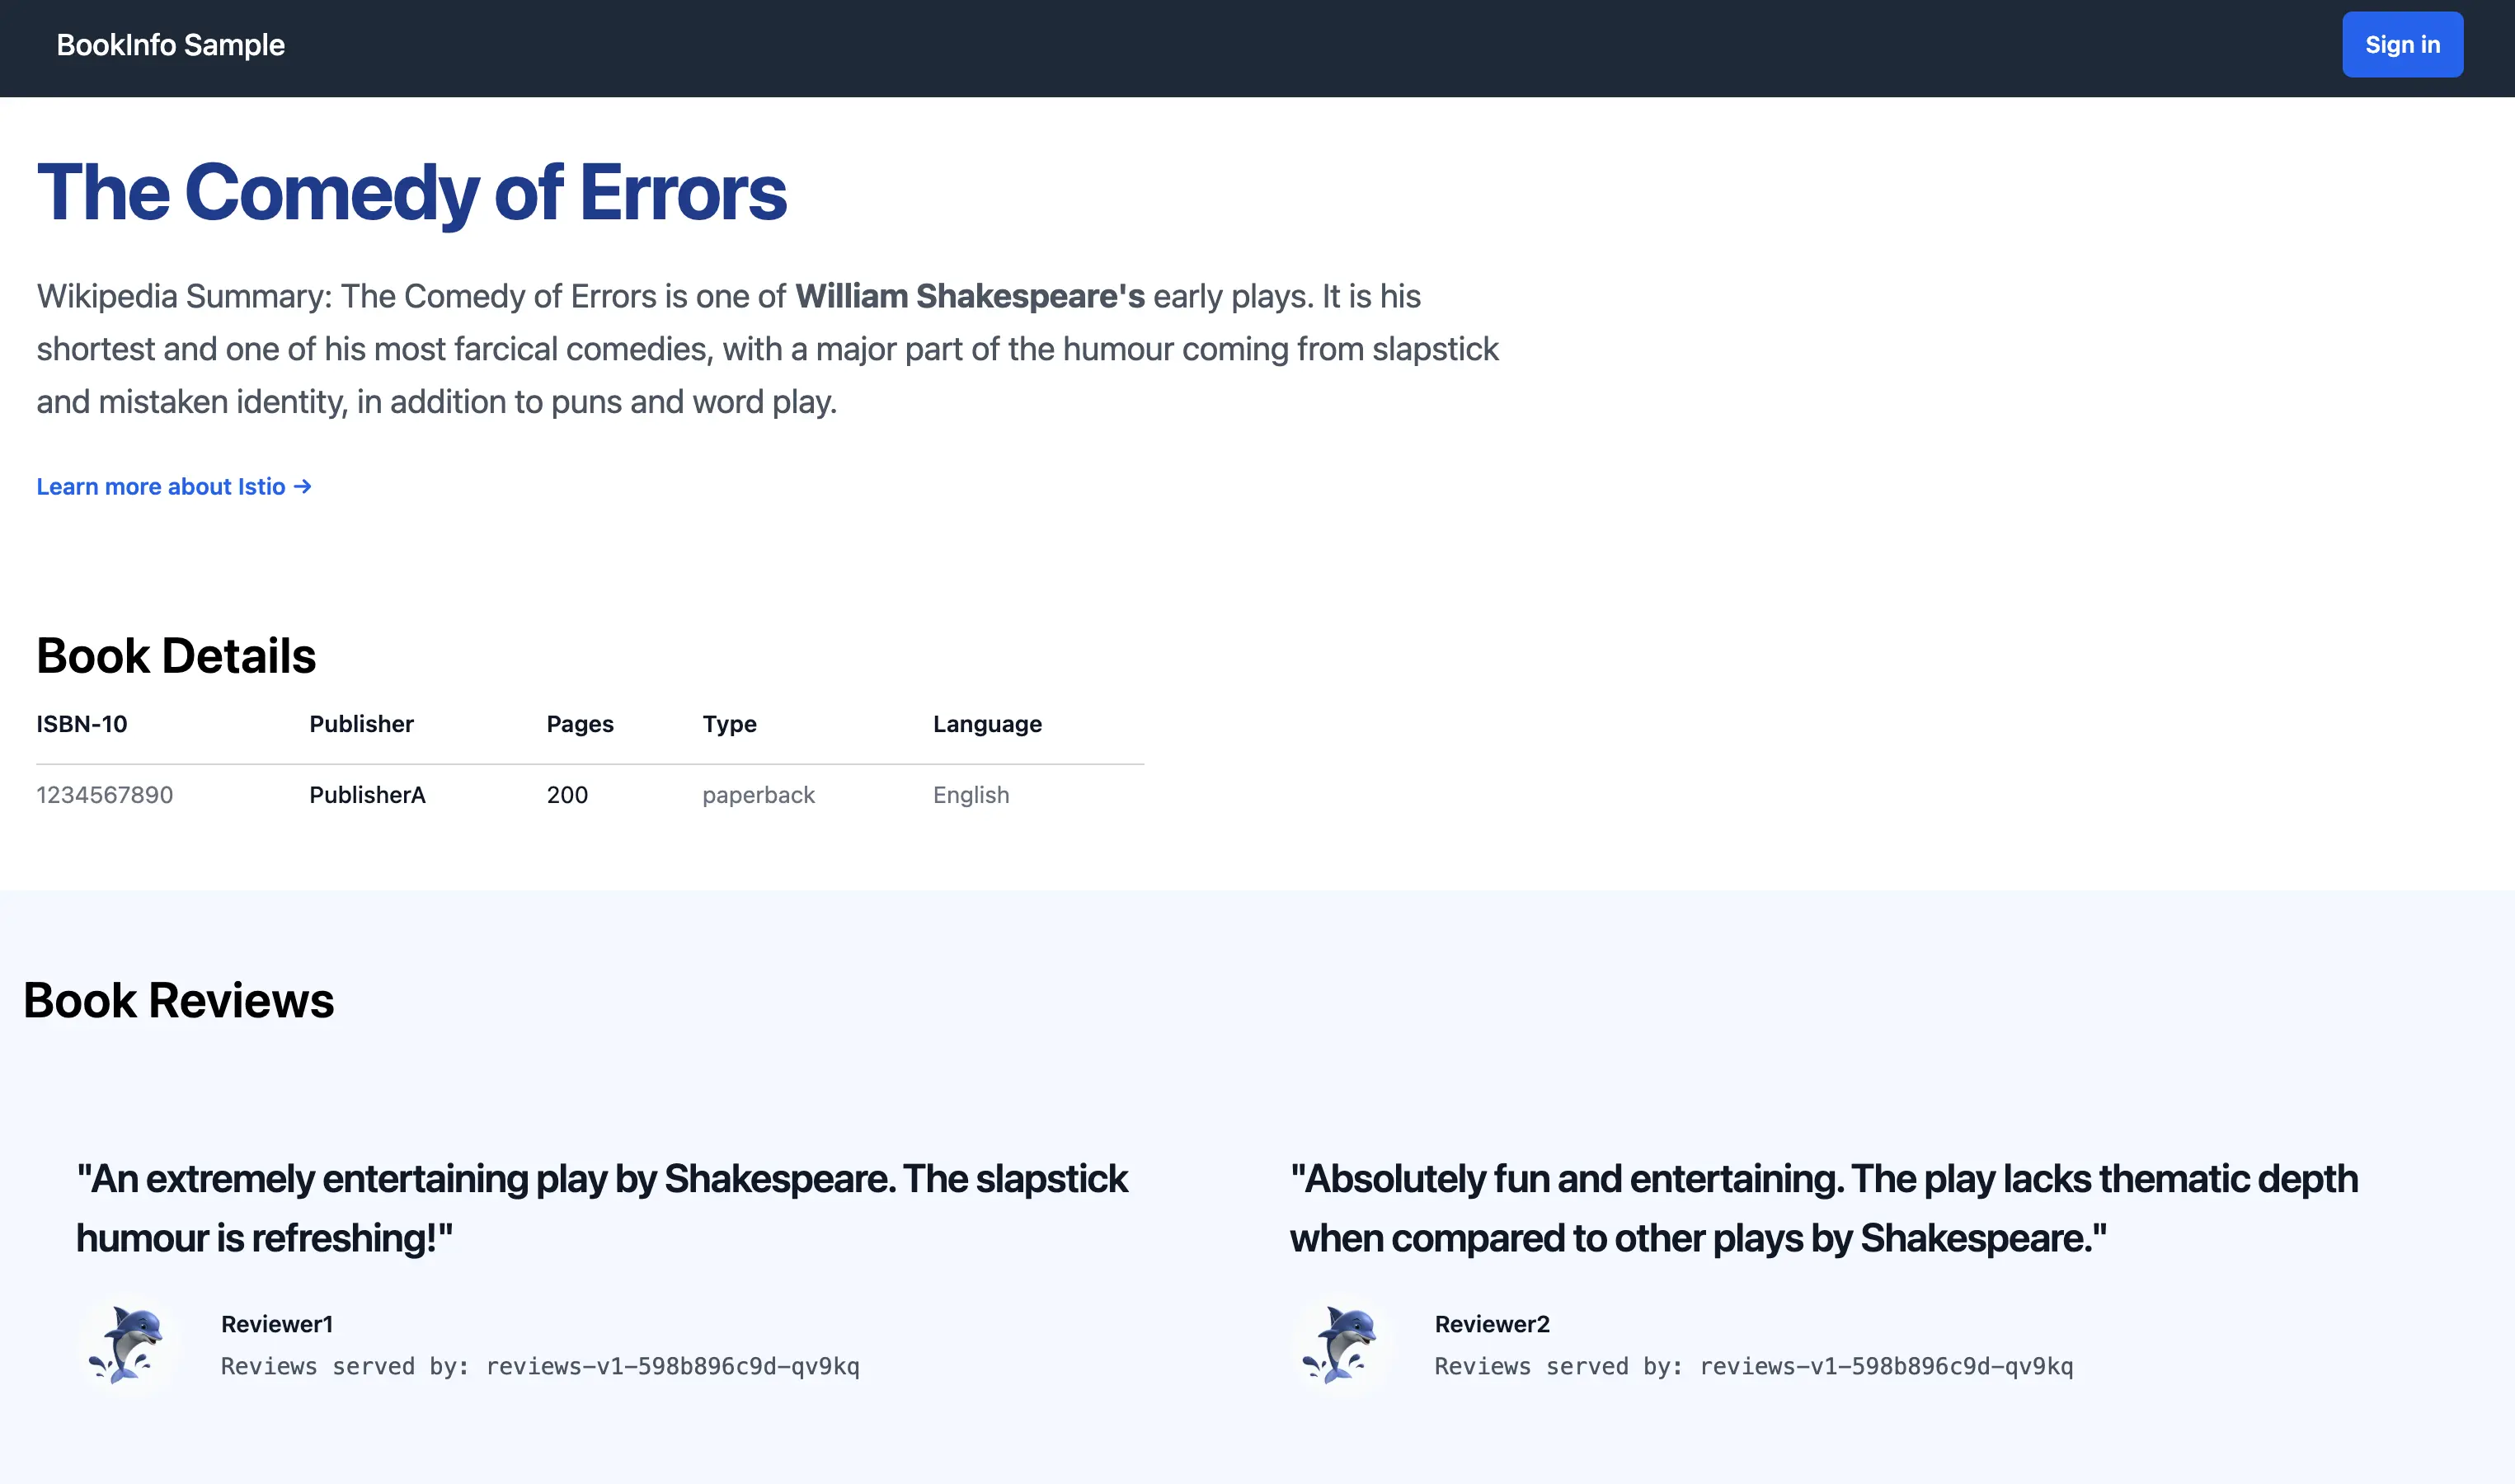
외부 접속으로 Bookinfo productpage UI가 정상 렌더링된 것을 확인한 화면입니다.
7. 관찰성 스택 (Prometheus, Kiali)
Prometheus, Grafana, Kiali를 함께 구성하면 트래픽과 지표를 시각적으로 확인할 수 있습니다.
- grafana:
30000 - prometheus:
30001 - kiali:
30002
Kiali 설치 후에는 Istio 관련 ServiceMonitor/PodMonitor를 적용해 메트릭 수집 범위를 확장할 수 있습니다.
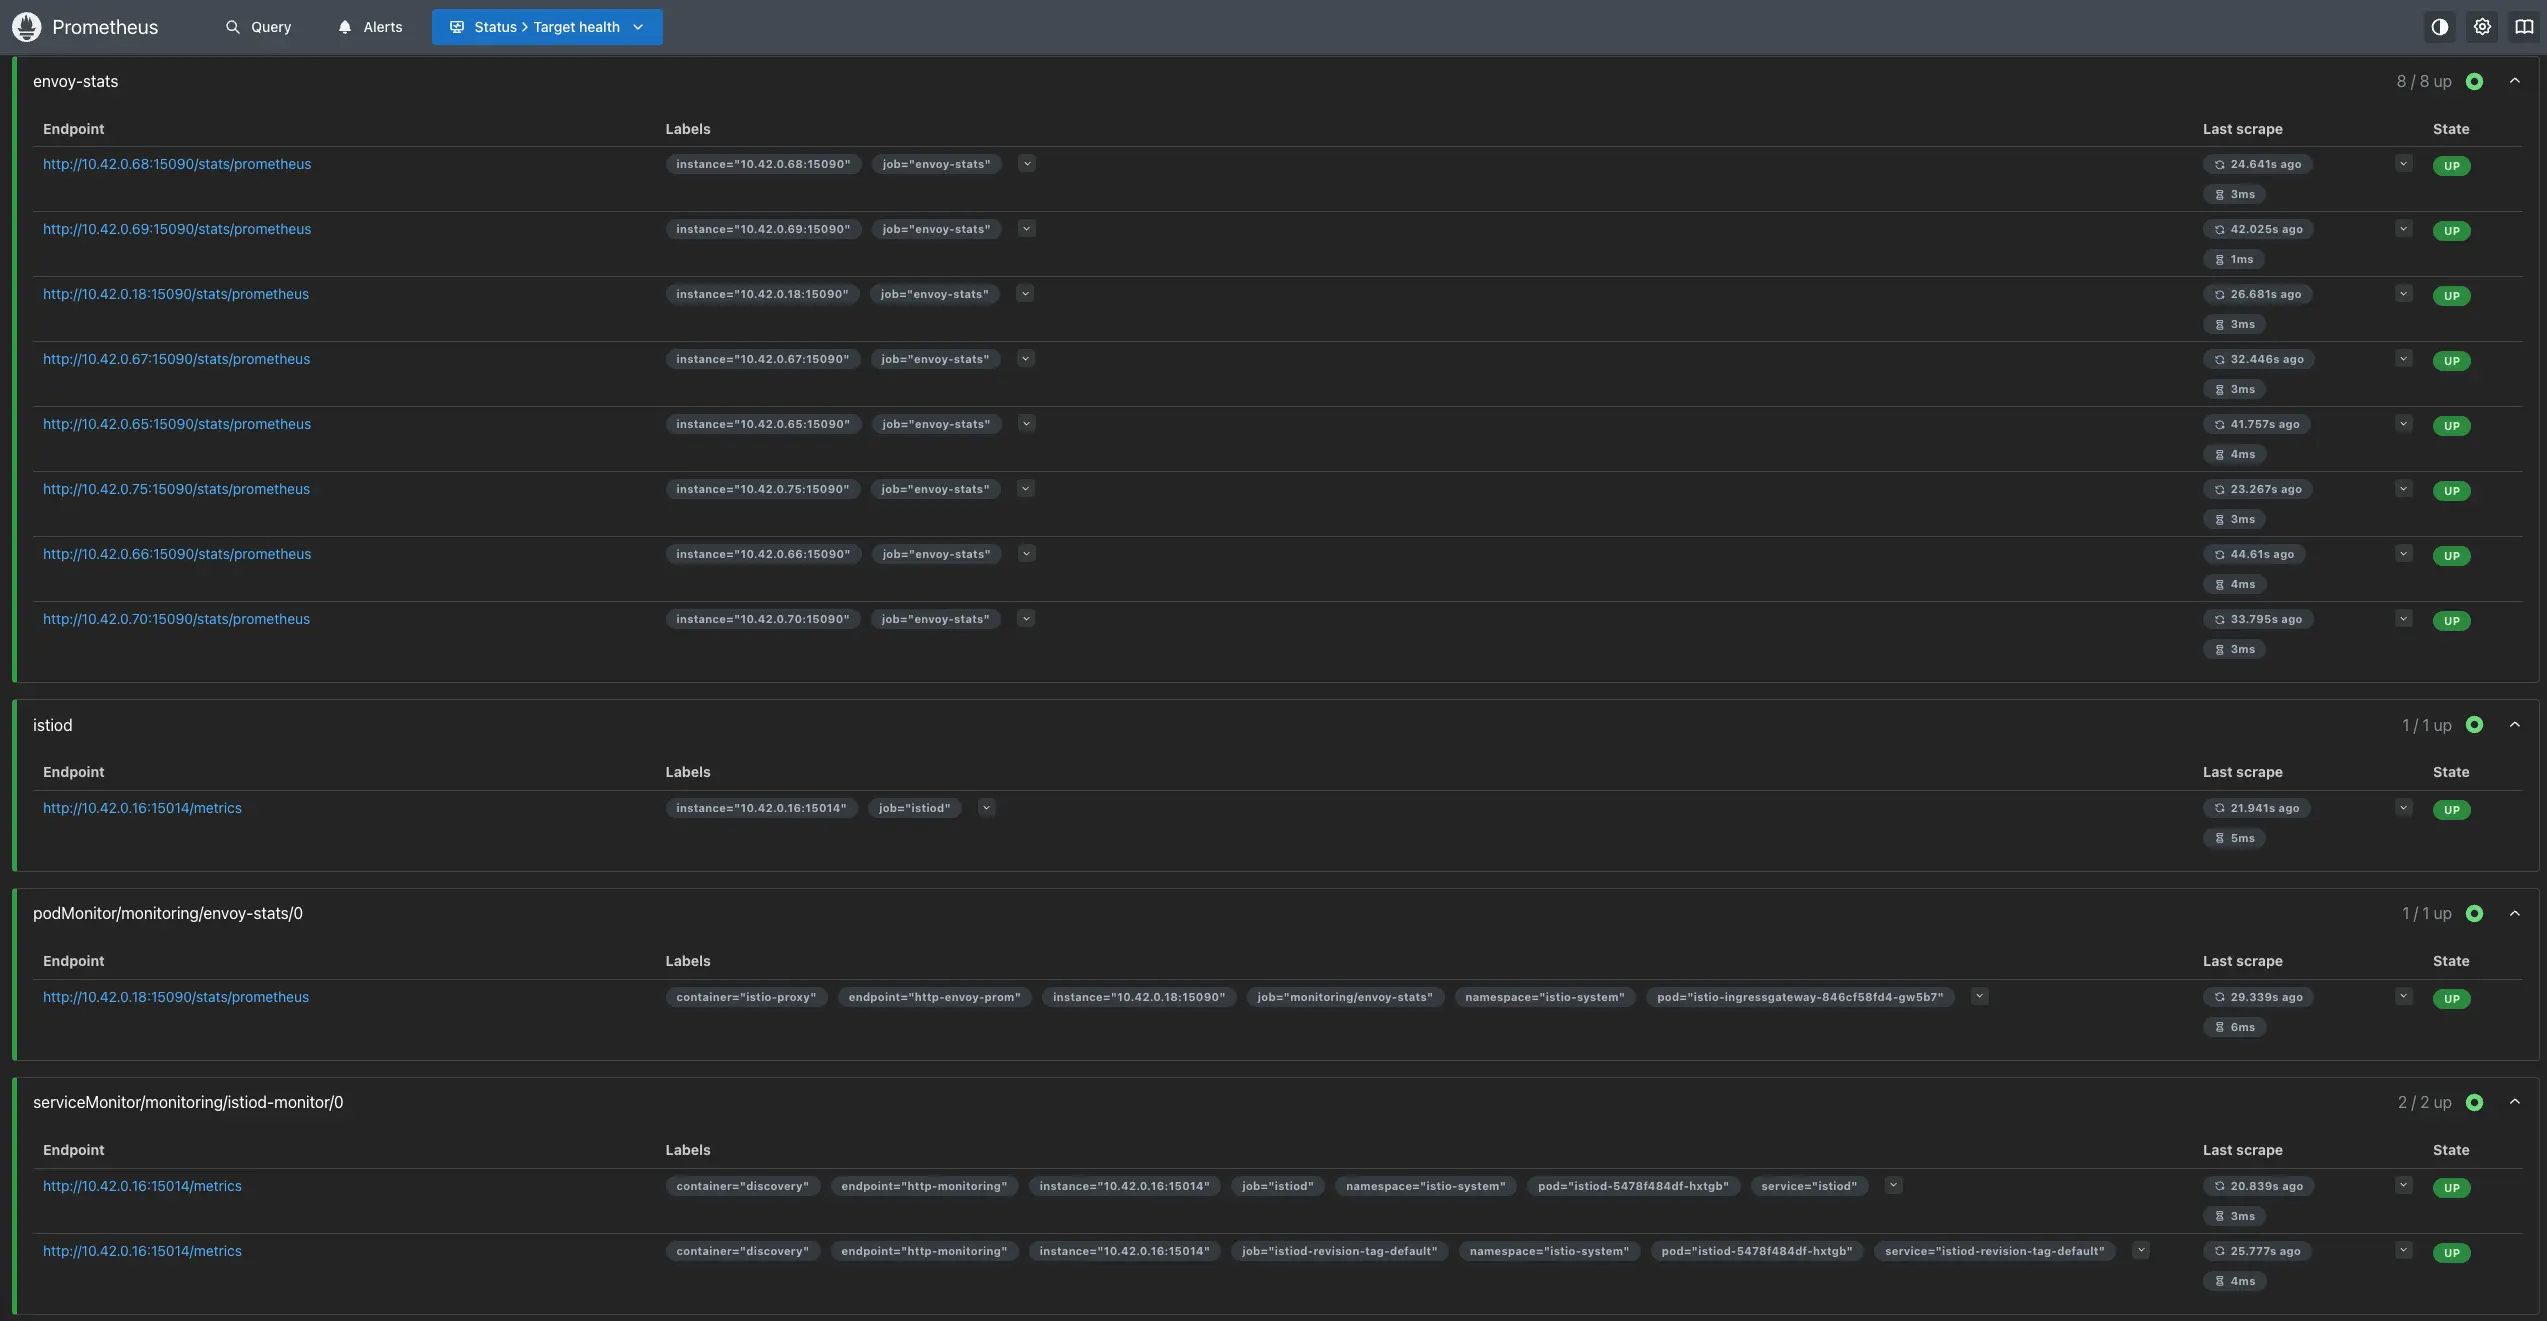
Prometheus Targets에서 Istio 관련 타겟이 정상 수집(Up)되는 상태를 확인한 화면입니다.
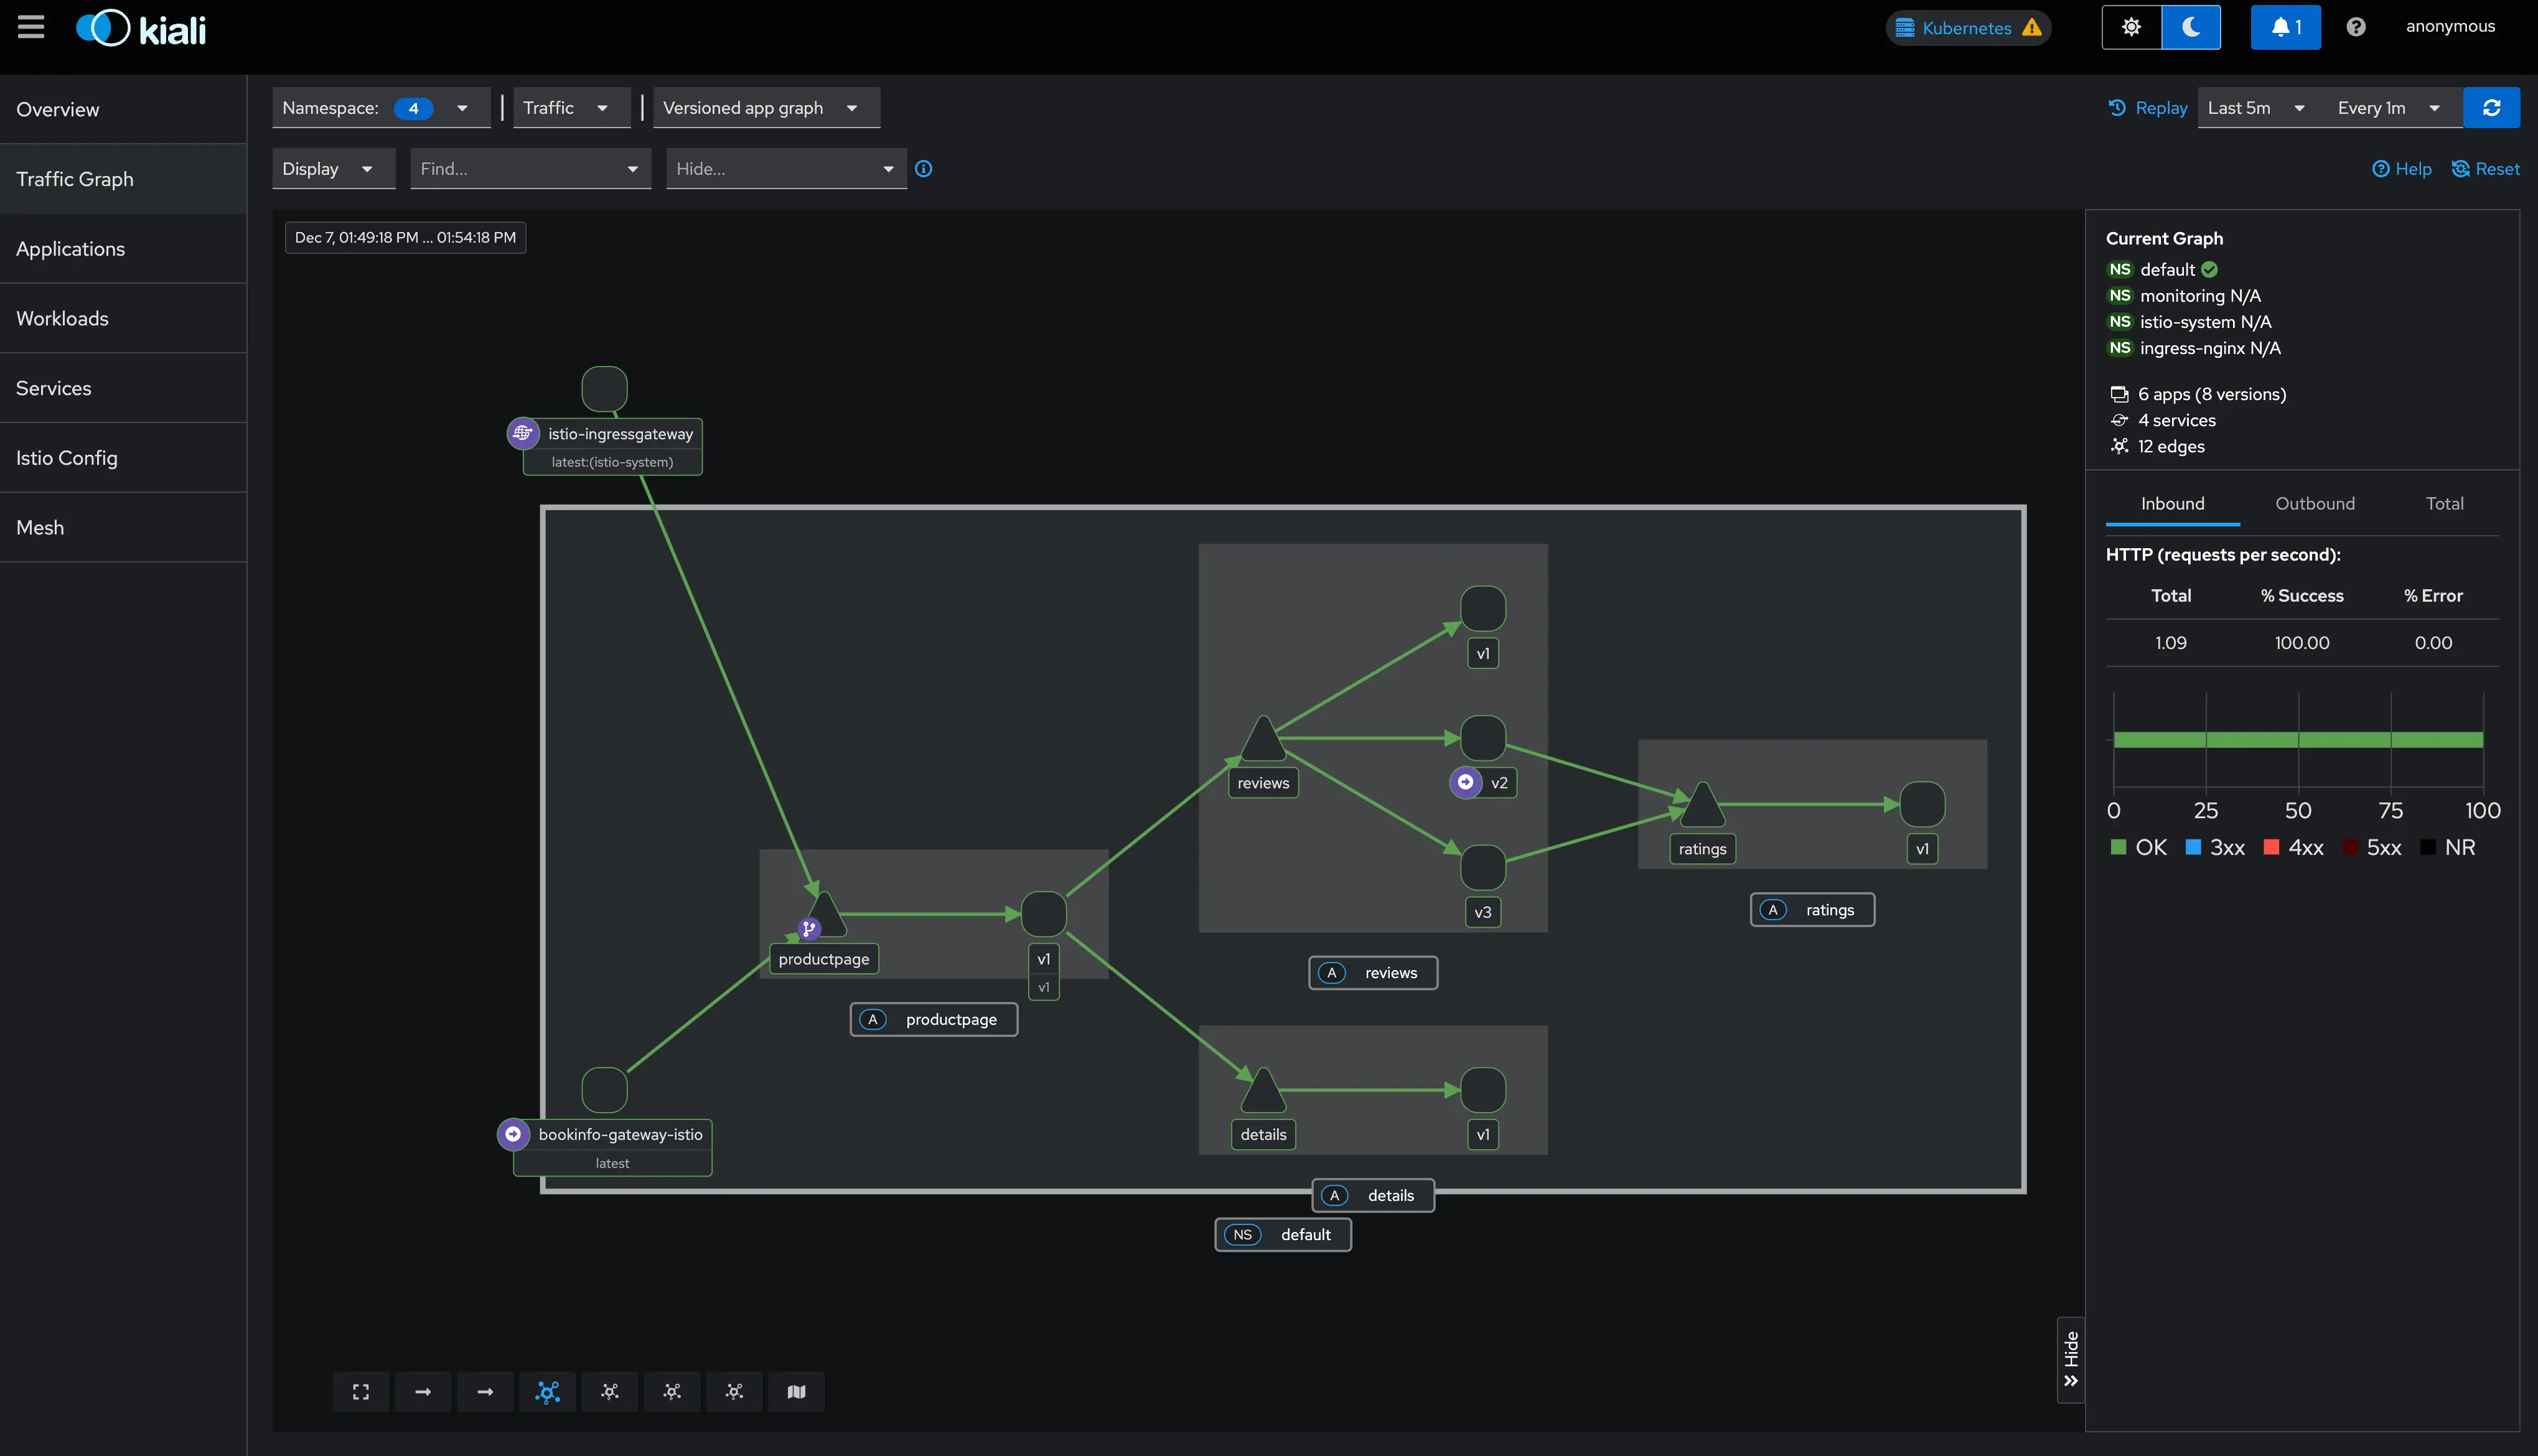
Kiali 대시보드에서 서비스 간 트래픽 흐름과 메트릭이 시각화된 상태를 보여줍니다.
8. CNI 모드 전환 (옵션)
Sidecar 주입 시 initContainer가 NET_ADMIN 권한을 요구하는 환경이라면 CNI 모드를 고려할 수 있습니다.
1
2
3
4
5
6
7
apiVersion: install.istio.io/v1alpha1
kind: IstioOperator
spec:
  components:
    cni:
      namespace: istio-system
      enabled: true
1
istioctl install -f istio-cni.yaml -y

9. Reference
- KubeOps - 이스티오(Istio) 시작하기 Istio 설치하기
- Istio Docs - Getting Started
- Istio Docs - What is Istio?
- Istio Docs - Data Plane Modes
- GitHub - istio/istio
- Istio Docs - Kiali Integration
- Kiali Docs - Documentation
궁금하신 점이나 추가해야 할 부분은 댓글이나 아래의 링크를 통해 문의해주세요.
Written with KKamJi