Ansible 개념, 사용 방법

Inventory와 playbook은 control node에 있고, managed host에는 사전에 Ansible agent를 설치하지 않습니다.
ansible-playbook가 실행되는 위치입니다.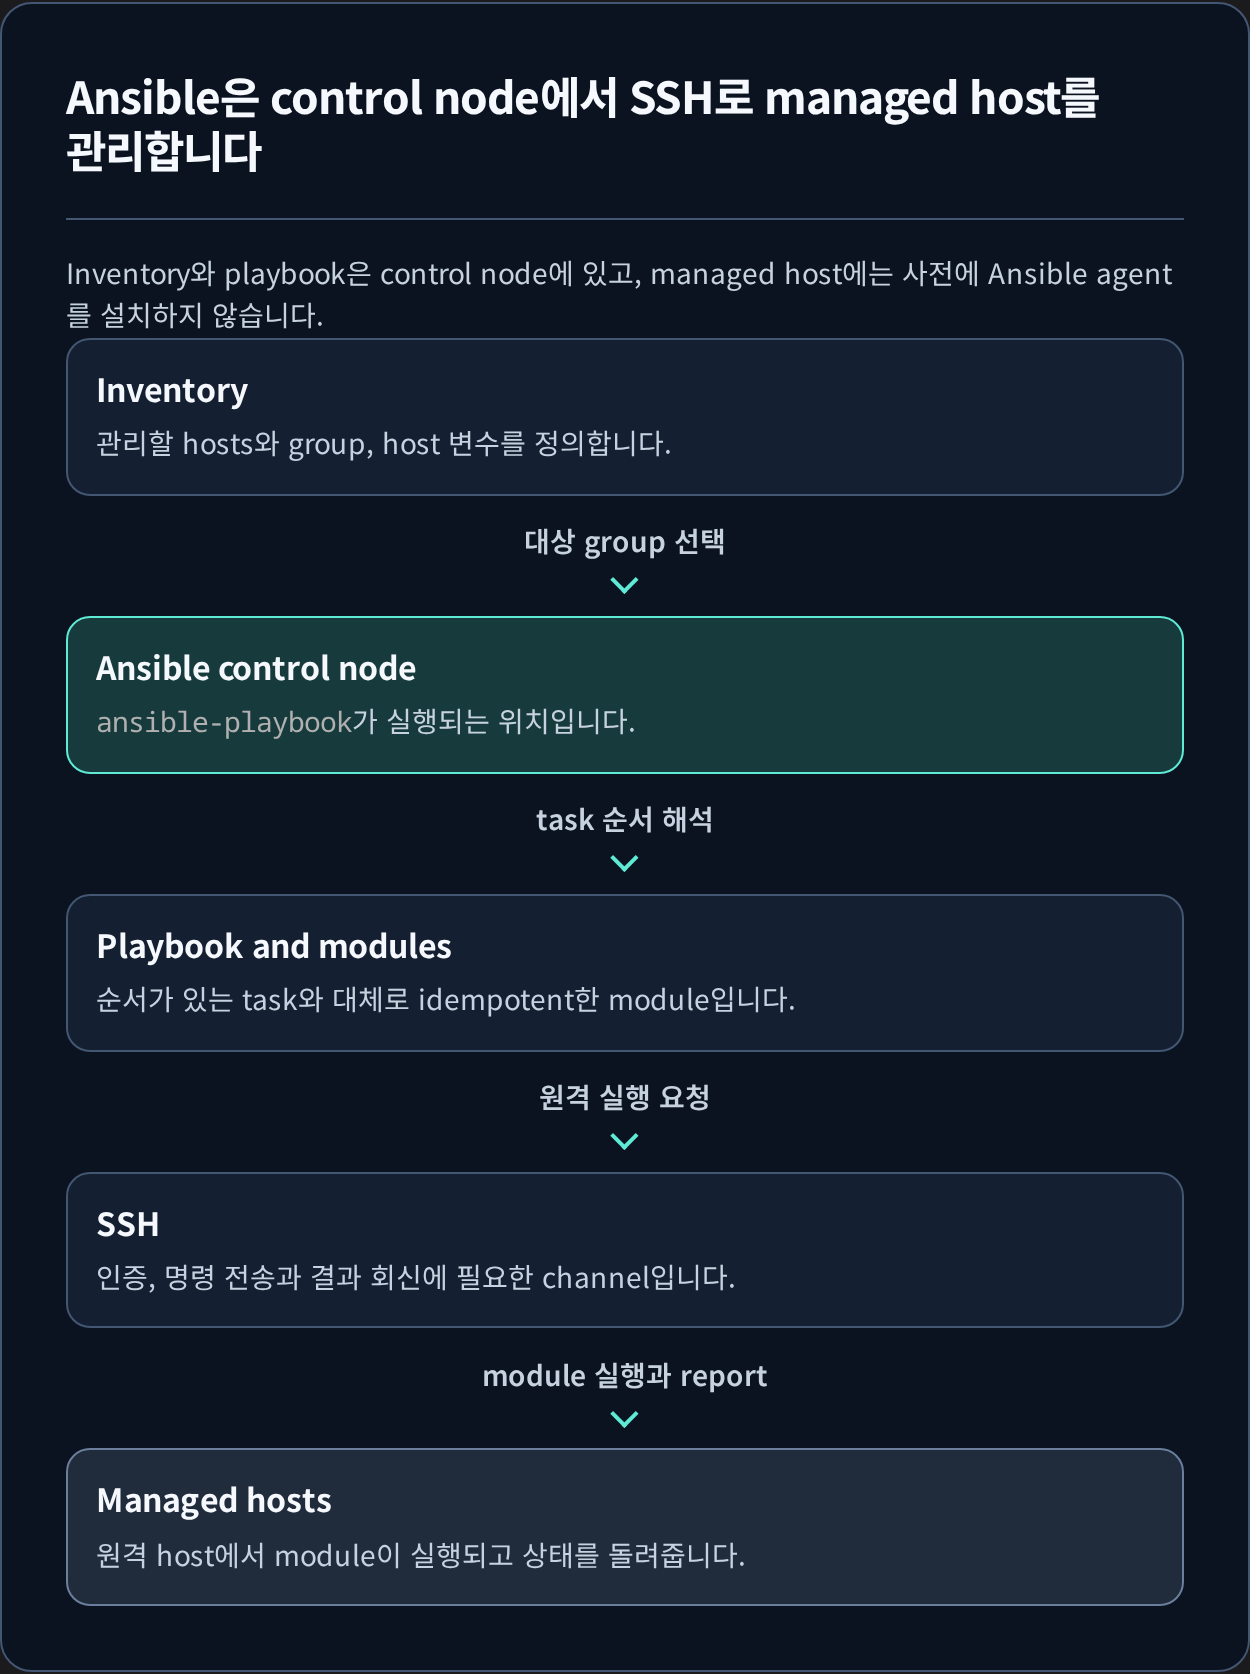
1. Ansible의 개념
Ansible은 오픈 소스 IT 자동화 도구로, 구성 관리, 애플리케이션 배포, 작업 자동화 및 IT 오케스트레이션을 쉽게 수행할 수 있도록 설계되었습니다. Ansible은 에이전트가 필요 없는 구조로, SSH를 통해 원격 시스템과 통신합니다. YAML 언어를 사용하여 구성 파일을 작성하므로, 사람이 읽고 쓰기 쉽습니다.
2. Ansible의 주요 개념
2.1. Playbook
- Ansible의 작업을 정의한 YAML 파일입니다.
- 작업을 순차적으로 기술하여 원하는 상태를 만들 수 있습니다.
2.2. Task
- 플레이북 내에서 실행되는 단일 작업입니다.
- 특정 모듈을 사용하여 정의됩니다.
2.3. Module
- Ansible에서 다양한 작업을 수행하는 코드 단위입니다.
- 예: yum 모듈, apt 모듈, copy 모듈 등.
2.4. Inventory
- 관리할 호스트 목록을 정의하는 파일입니다.
- 호스트 그룹을 정의하고 각 호스트의 변수도 설정할 수 있습니다.
2.5. Role
- 관련된 플레이북, 태스크, 핸들러 등을 한곳에 모은 디렉토리 구조입니다.
- 복잡한 작업을 모듈화하고 재사용할 수 있게 합니다.
2.6. Handler
- 특정 조건이 충족되었을 때 실행되는 태스크입니다.
- 일반적으로 서비스 재시작과 같은 작업에 사용됩니다.
3. Ansible 사용 방법
3.1. 설치
1
2
3
4
5
6
7
8
9
10
11
12
13
14
❯ sudo apt update
❯ sudo apt install -y ansible
...

❯ ansible --version
ansible [core 2.16.3]
  config file = None
  configured module search path = ['/root/.ansible/plugins/modules', '/usr/share/ansible/plugins/modules']
  ansible python module location = /usr/lib/python3/dist-packages/ansible
  ansible collection location = /root/.ansible/collections:/usr/share/ansible/collections
  executable location = /usr/bin/ansible
  python version = 3.12.3 (main, Apr 10 2024, 05:33:47) [GCC 13.2.0] (/usr/bin/python3)
  jinja version = 3.1.2
  libyaml = True
3.2. SSH 키 생성 및 배포
3.2.1. 키 생성
생성된 키는 기본적으로 ~/.ssh/id_rsa와 ~/.ssh/id_rsa.pub에 저장됩니다.
1
2
3
4
5
6
7
8
9
10
11
12
13
14
15
16
17
18
19
20
21
❯ ssh-keygen -t rsa -b 4096
Generating public/private rsa key pair.
Enter file in which to save the key (/root/.ssh/id_rsa):
Enter passphrase (empty for no passphrase):
Enter same passphrase again:
Your identification has been saved in /root/.ssh/id_rsa
Your public key has been saved in /root/.ssh/id_rsa.pub
The key fingerprint is:
SHA256:XH55jQCk6FGaleXWuSzUV/LupuxBxSBogVUFQP2+QyI root@kkamji
The key's randomart image is:
+---[RSA 4096]----+
|        oBO*+o+ .|
|       *ooo+.o * |
|      = ..= =.. +|
|     . o = . =.= |
|      . S o =.+ o|
|          Eo.oo. |
|           . o..o|
|             .o+ |
|             .+. |
+----[SHA256]-----+
3.2.2. 키 배포
1
2
3
4
5
6
7
8
9
10
11
12
13
14
15
16
17
18
19
20
21
22
23
❯ ssh-copy-id -i ~/.ssh/id_rsa.pub root@192.168.0.21

/usr/bin/ssh-copy-id: INFO: Source of key(s) to be installed: "/root/.ssh/id_rsa.pub"
/usr/bin/ssh-copy-id: INFO: attempting to log in with the new key(s), to filter out any that are already installed
/usr/bin/ssh-copy-id: INFO: 1 key(s) remain to be installed -- if you are prompted now it is to install the new keys
root@192.168.0.21's password:

Number of key(s) added: 1

Now try logging into the machine, with:   "ssh 'root@192.168.0.21'"
and check to make sure that only the key(s) you wanted were added.

❯ ssh-copy-id -i ~/.ssh/id_rsa.pub root@192.168.0.19

/usr/bin/ssh-copy-id: INFO: Source of key(s) to be installed: "/root/.ssh/id_rsa.pub"
/usr/bin/ssh-copy-id: INFO: attempting to log in with the new key(s), to filter out any that are already installed
/usr/bin/ssh-copy-id: INFO: 1 key(s) remain to be installed -- if you are prompted now it is to install the new keys
root@192.168.0.19's password:

Number of key(s) added: 1

Now try logging into the machine, with:   "ssh 'root@192.168.0.19'"
and check to make sure that only the key(s) you wanted were added.
3.3. Inventory 파일 설정
Inventory 파일은 기본적으로
/etc/ansible/hosts에 위치하며, 커스텀 파일도 사용할 수 있습니다. 해당 포스트에서는etc/ansible/hosts파일을 사용하겠습니다.
설정 완료 후ansible all -m ping해당 명령어를 통해 연결 확인 가능합니다. 커스텀 파일을 사용할 경우-i옵션을 사용해 인벤토리 파일을 지정해주어야 합니다. 또한 key-pair 방식이 아닌 password방식을 사용할 경우-k옵션을 사용해야합니다.
1
2
3
4
5
6
7
8
9
10
11
12
13
14
15
16
17
18
19
20
21
22
❯ vim /etc/ansible/hosts
❯ cat /etc/ansible/hosts
[worker_nodes]
192.168.0.19 # node01
192.168.0.21 # node02

❯ ansible all -m ping

192.168.0.21 | SUCCESS => {
    "ansible_facts": {
        "discovered_interpreter_python": "/usr/bin/python3"
    },
    "changed": false,
    "ping": "pong"
}
192.168.0.19 | SUCCESS => {
    "ansible_facts": {
        "discovered_interpreter_python": "/usr/bin/python3"
    },
    "changed": false,
    "ping": "pong"
}
3.4. Playbook 작성
Playbook은 YAML 형식으로 작성됩니다. Playbook을 활용해 Nginx를 설치하는 간단한 실습을 진행해보겠습니다.
1
2
3
4
5
6
7
8
9
10
11
12
13
14
15
16
17
18
19
20
21
22
23
24
25
❯ vim nginx-playbook.yaml
❯ cat nginx-playbook.yaml
---
- hosts: worker_nodes # 플레이북이 적용될 호스트 그룹 지
  become: yes # 작업을 실행할 때 루트 권한을 사용할지 여부를 지정
  tasks: # 실행할 작업 목록을 정의
    - name: Install Nginx
      apt:
        name: nginx
        state: present # 패키지의 상태를 지정. present => 패키지 설치 or 업그레이드, absent => 패키지 제거
❯ ansible-playbook nginx-playbook.yaml

PLAY [worker_nodes] *****************************************************************************************************************************************************************************************************

TASK [Gathering Facts] **************************************************************************************************************************************************************************************************
ok: [192.168.0.19]
ok: [192.168.0.21]

TASK [Install Nginx] ****************************************************************************************************************************************************************************************************
changed: [192.168.0.19]
changed: [192.168.0.21]

PLAY RECAP **************************************************************************************************************************************************************************************************************
192.168.0.19               : ok=2    changed=1    unreachable=0    failed=0    skipped=0    rescued=0    ignored=0
192.168.0.21               : ok=2    changed=1    unreachable=0    failed=0    skipped=0    rescued=0    ignored=0
3.5. nginx 동작 확인
shell 모듈, command 모듈, service 모듈을 사용해 확인할 수 있습니다. 해당 포스트에서는 shell 모듈, command 모듈, curl 명령어를 통해 확인했으며 각각의 모듈에 대한 설명은 다음과 같습니다.
- shell 모듈: 쉘 환경에서 복잡한 명령을 실행할 때 사용. 파이프라인, 리디렉션, 환경 변수 설정 등이 필요할 때 유용. 보안상 쉘 인젝션 주의.
- command 모듈: 단순한 시스템 명령을 안전하게 실행할 때 사용. 쉘 기능을 지원하지 않기 때문에 보안성이 높음.
- service 모듈: 시스템의 서비스를 관리합니다. 서비스 시작, 중지, 재시작, 상태 확인 등을 쉽게 수행 가능.
shell 모듈 사용
1
2
3
4
5
6
7
8
9
10
11
12
13
14
15
16
17
18
19
20
21
22
23
24
25
26
27
28
29
30
31
32
33
34
35
36
37
38
39
❯ ansible worker_nodes -m shell -a "systemctl status nginx"

192.168.0.19 | CHANGED | rc=0 >>
● nginx.service - A high performance web server and a reverse proxy server
     Loaded: loaded (/usr/lib/systemd/system/nginx.service; enabled; preset: enabled)
     Active: active (running) since Sat 2024-06-22 08:24:36 UTC; 5min ago
       Docs: man:nginx(8)
    Process: 2702 ExecStartPre=/usr/sbin/nginx -t -q -g daemon on; master_process on; (code=exited, status=0/SUCCESS)
    Process: 2704 ExecStart=/usr/sbin/nginx -g daemon on; master_process on; (code=exited, status=0/SUCCESS)
   Main PID: 2707 (nginx)
      Tasks: 3 (limit: 2198)
     Memory: 2.4M (peak: 2.6M)
        CPU: 10ms
     CGroup: /system.slice/nginx.service
             ├─2707 "nginx: master process /usr/sbin/nginx -g daemon on; master_process on;"
             ├─2708 "nginx: worker process"
             └─2709 "nginx: worker process"

Jun 22 08:24:36 Node02 systemd[1]: Starting nginx.service - A high performance web server and a reverse proxy server...
Jun 22 08:24:36 Node02 systemd[1]: Started nginx.service - A high performance web server and a reverse proxy server.
192.168.0.21 | CHANGED | rc=0 >>
● nginx.service - A high performance web server and a reverse proxy server
     Loaded: loaded (/usr/lib/systemd/system/nginx.service; enabled; preset: enabled)
     Active: active (running) since Sat 2024-06-22 08:24:36 UTC; 4min 59s ago
       Docs: man:nginx(8)
    Process: 3069 ExecStartPre=/usr/sbin/nginx -t -q -g daemon on; master_process on; (code=exited, status=0/SUCCESS)
    Process: 3071 ExecStart=/usr/sbin/nginx -g daemon on; master_process on; (code=exited, status=0/SUCCESS)
   Main PID: 3072 (nginx)
      Tasks: 3 (limit: 2198)
     Memory: 2.7M (peak: 3.0M)
        CPU: 12ms
     CGroup: /system.slice/nginx.service
             ├─3072 "nginx: master process /usr/sbin/nginx -g daemon on; master_process on;"
             ├─3073 "nginx: worker process"
             └─3074 "nginx: worker process"

Jun 22 08:24:36 Node01 systemd[1]: Starting nginx.service - A high performance web server and a reverse proxy server...
Jun 22 08:24:36 Node01 systemd[1]: Started nginx.service - A high performance web server and a reverse proxy server.
--------------------------------------------------
command 모듈 사용
1
2
3
4
5
6
❯ ansible worker_nodes -m command -a "nginx -v"

192.168.0.21 | CHANGED | rc=0 >>
nginx version: nginx/1.24.0 (Ubuntu)
192.168.0.19 | CHANGED | rc=0 >>
nginx version: nginx/1.24.0 (Ubuntu)
curl 명령어로 직접 확인
1
2
3
4
5
6
7
8
9
10
11
12
13
14
15
16
17
18
19
20
21
22
23
24
25
26
27
28
29
30
31
32
33
34
35
36
37
38
39
40
41
42
43
44
45
46
47
48
❯ curl 192.168.0.21
<!DOCTYPE html>
<html>
<head>
<title>Welcome to nginx!</title>
<style>
html { color-scheme: light dark; }
body { width: 35em; margin: 0 auto;
font-family: Tahoma, Verdana, Arial, sans-serif; }
</style>
</head>
<body>
<h1>Welcome to nginx!</h1>
<p>If you see this page, the nginx web server is successfully installed and
working. Further configuration is required.</p>

<p>For online documentation and support please refer to
<a href="http://nginx.org/">nginx.org</a>.<br/>
Commercial support is available at
<a href="http://nginx.com/">nginx.com</a>.</p>

<p><em>Thank you for using nginx.</em></p>
</body>
</html>
❯ curl 192.168.0.19
<!DOCTYPE html>
<html>
<head>
<title>Welcome to nginx!</title>
<style>
html { color-scheme: light dark; }
body { width: 35em; margin: 0 auto;
font-family: Tahoma, Verdana, Arial, sans-serif; }
</style>
</head>
<body>
<h1>Welcome to nginx!</h1>
<p>If you see this page, the nginx web server is successfully installed and
working. Further configuration is required.</p>

<p>For online documentation and support please refer to
<a href="http://nginx.org/">nginx.org</a>.<br/>
Commercial support is available at
<a href="http://nginx.com/">nginx.com</a>.</p>

<p><em>Thank you for using nginx.</em></p>
</body>
</html>
4. 요약
이 포스트에서는 Ansible의 개념과 주요 요소들을 살펴보고, SSH 키 생성 및 배포, 인벤토리 파일 설정, 플레이북 작성 및 실행, 그리고 Nginx 설치 후 동작 확인 방법을 소개했습니다. 이를 통해 Ansible을 활용하여 IT 자동화 작업을 쉽게 수행할 수 있는 방법을 배웠습니다.
5. Reference
궁금하신 점이나 추가해야 할 부분은 댓글이나 아래의 링크를 통해 문의해주세요.
Written with KKamJi