Vagrant와 VirtualBox로 Kubernetes Cluster 구축하기 [Cilium Study 1주차]

CloudNet@ 팀에서 주관하는 Cilium Study에 참가하게 되었습니다.
이번 포스트에서는 Vagrant를 사용해 VirtualBox에 VM을 3대 배포하고, VM에서 Script를 실행시켜 아래와 같은 쿠버네티스 클러스터를 프로비저닝하는 내용에 대해 다루어 보도록 하겠습니다.
현재 개선된 설정 파일들을 깃허브에 올려두었습니다. 하지만 쿠버네티스를 배포하시는 분이시라면 아래의 내용대로 실습을 진행하며 각 명령어의 쓰임과 설정 파일의 의미에 대해 알아보신 뒤, 개선된 설정 파일과 비교하는 시간을 갖는 것을 추천드립니다.
GitHub Link - https://github.com/KKamJi98/cilium-lab/tree/main/vagrant/vagrant-advanced
1. 실습 환경
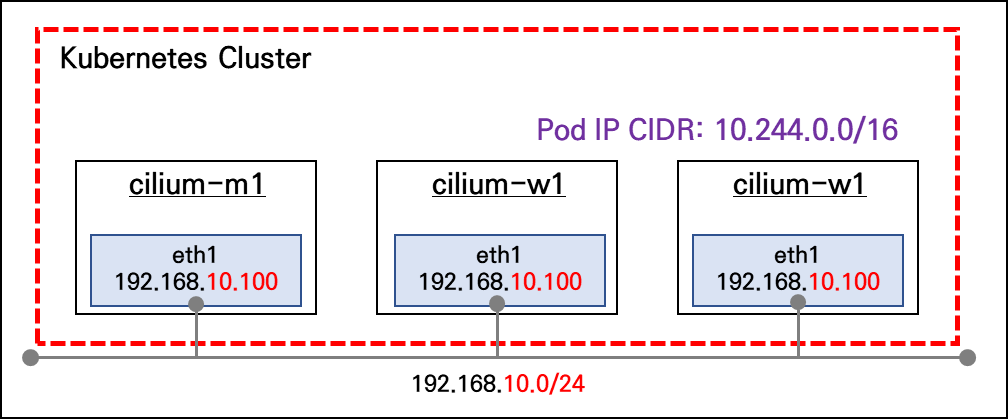
- VMs: cilium-m1, cilium-w1, cilium-w2
- eth0: 10.0.2.15 (VirtualBox의 NAT 네트워크 모드를 사용하므로, 각 VM의 eth0 인터페이스는 모두 동일한 IP인 10.0.2.15를 가짐)
- eth1: 각 VM의 IP (eth1 인터페이스는 VirtualBox의 Private Network로 설정되어 있어, VM 간 통신이 가능하며, 각 VM별로 고유한 IP가 할당됨)
- 초기 프로비저닝으로 kubeadm init 과 join 실행
- CNI 미설치 상태로 배포
2. Vagrant와 VirtualBox 설치
mac M사용자- VirtualBox 설치 - Release
1
2
3
4
5
  # VirtualBox 설치
  brew install --cask virtualbox

  VBoxManage --version
  7.1.10r169112
- Vagrant 설치
1
2
3
4
5
  # Vagrant 설치
  brew install --cask vagrant

  vagrant version
  Installed Version: 2.4.7
Windows사용자- VirtualBox 설치 - https://www.virtualbox.org/wiki/Downloads
- Vagrant 설치 - https://developer.hashicorp.com/vagrant/downloads#windows
3. Vagrantfile & Init Script 작성
각 VM이 동일한 key-pair를 갖게 하기 위해서 config.ssh.insert_key = false 해당 부분을 추가해주었고, 로컬에서 hyper-v + kube-spray를 통해 프로비저닝한 다른 클러스터와 호스트명이 겹치는 것을 방지하기 위해 호스트명을 아래와 같이 수정하였습니다. 또한 다른 환경에서 해당 클러스터로의 접근을 위해 localhost의 56444 포트를 Control Plane인 cilium-m1 VM의 6443 포트(API-Server 포트)로 포트포워딩 하는 설정을 추가했습니다.
k8s-ctr->cilium-m1k8s-w1->cilium-w1k8s-w2->cilium-w2
3.1. Vagrantfile
Vagrantfile은 Vagrant가 가상 머신(또는 컨테이너)을 생성할 때 베이스 이미지, 자원 할당, 프로비저닝 방식 등을 선언적으로 기술하는 루비 기반 설정 파일입니다.
1
2
3
4
5
6
7
8
9
10
11
12
13
14
15
16
17
18
19
20
21
22
23
24
25
26
27
28
29
30
31
32
33
34
35
36
37
38
39
40
41
42
43
44
45
46
47
48
49
50
51
52
53
54
55
56
## Vagrantfile
# Variables
K8SV = '1.33.2-1.1' # Kubernetes Version : apt list -a kubelet , ex) 1.32.5-1.1
CONTAINERDV = '1.7.27-1' # Containerd Version : apt list -a containerd.io , ex) 1.6.33-1
N = 2 # max number of worker nodes

# Base Image  https://portal.cloud.hashicorp.com/vagrant/discover/bento/ubuntu-24.04
## Rocky linux Image https://portal.cloud.hashicorp.com/vagrant/discover/rockylinux
BOX_IMAGE = "bento/ubuntu-24.04"
BOX_VERSION = "202502.21.0"

Vagrant.configure("2") do |config|
#-ControlPlane Node
  config.ssh.insert_key = false # 추가 -> insecure key 재사용
  config.vm.define "cilium-m1" do |subconfig|
    subconfig.vm.box = BOX_IMAGE
    subconfig.vm.box_version = BOX_VERSION
    subconfig.vm.provider "virtualbox" do |vb|
      vb.customize ["modifyvm", :id, "--groups", "/Cilium-Lab"]
      vb.customize ["modifyvm", :id, "--nicpromisc2", "allow-all"]
      vb.name = "cilium-m1"
      vb.cpus = 2
      vb.memory = 2048
      vb.linked_clone = true
    end
    subconfig.vm.host_name = "cilium-m1"
    subconfig.vm.network "private_network", ip: "192.168.10.100"
    subconfig.vm.network "forwarded_port", guest: 22, host: 60000, auto_correct: true, id: "ssh"
    subconfig.vm.network "forwarded_port", guest: 6443, host: 56444, auto_correct: true, id: "api-server" # 추가
    subconfig.vm.synced_folder "./", "/vagrant", disabled: true
    subconfig.vm.provision "shell", path: "init_cfg.sh", args: [ K8SV, CONTAINERDV]
    subconfig.vm.provision "shell", path: "k8s-ctr.sh", args: [ N ]
  end

#-Worker Nodes Subnet1
  (1..N).each do |i|
    config.vm.define "cilium-w#{i}" do |subconfig|
      subconfig.vm.box = BOX_IMAGE
      subconfig.vm.box_version = BOX_VERSION
      subconfig.vm.provider "virtualbox" do |vb|
        vb.customize ["modifyvm", :id, "--groups", "/Cilium-Lab"]
        vb.customize ["modifyvm", :id, "--nicpromisc2", "allow-all"]
        vb.name = "cilium-w#{i}"
        vb.cpus = 2
        vb.memory = 1536
        vb.linked_clone = true
      end
      subconfig.vm.host_name = "cilium-w#{i}"
      subconfig.vm.network "private_network", ip: "192.168.10.10#{i}"
      subconfig.vm.network "forwarded_port", guest: 22, host: "6000#{i}", auto_correct: true, id: "ssh"
      subconfig.vm.synced_folder "./", "/vagrant", disabled: true
      subconfig.vm.provision "shell", path: "init_cfg.sh", args: [ K8SV, CONTAINERDV]
      subconfig.vm.provision "shell", path: "k8s-w.sh"
    end
  end
end
3.2. init_cfg.sh
공식문서의 내용을 기반으로 만들어진 kubeadm으로 Control Plane, Data Plane VM 모두가 가져야 할 기본 설정에 대한 Script입니다. Docs - Bootstrapping clusters with kubeadm
1
2
3
4
5
6
7
8
9
10
11
12
13
14
15
16
17
18
19
20
21
22
23
24
25
26
27
28
29
30
31
32
33
34
35
36
37
38
39
40
41
42
43
44
45
46
47
48
49
50
51
52
53
54
55
56
57
58
59
60
61
62
63
64
65
66
67
68
69
70
71
#!/usr/bin/env bash

echo ">>>> Initial Config Start <<<<"

echo "[TASK 1] Setting Profile & Change Timezone"
echo 'alias vi=vim' >> /etc/profile
echo "sudo su -" >> /home/vagrant/.bashrc
ln -sf /usr/share/zoneinfo/Asia/Seoul /etc/localtime


echo "[TASK 2] Disable AppArmor"
systemctl stop ufw && systemctl disable ufw >/dev/null 2>&1
systemctl stop apparmor && systemctl disable apparmor >/dev/null 2>&1


echo "[TASK 3] Disable and turn off SWAP"
swapoff -a && sed -i '/swap/s/^/#/' /etc/fstab


echo "[TASK 4] Install Packages"
apt update -qq >/dev/null 2>&1
apt-get install apt-transport-https ca-certificates curl gpg -y -qq >/dev/null 2>&1

# Download the public signing key for the Kubernetes package repositories.
mkdir -p -m 755 /etc/apt/keyrings
K8SMMV=$(echo $1 | sed -En 's/^([0-9]+\.[0-9]+)\..*/\1/p')
curl -fsSL https://pkgs.k8s.io/core:/stable:/v$K8SMMV/deb/Release.key | sudo gpg --dearmor -o /etc/apt/keyrings/kubernetes-apt-keyring.gpg
echo "deb [signed-by=/etc/apt/keyrings/kubernetes-apt-keyring.gpg] https://pkgs.k8s.io/core:/stable:/v$K8SMMV/deb/ /" >> /etc/apt/sources.list.d/kubernetes.list
curl -fsSL https://download.docker.com/linux/ubuntu/gpg -o /etc/apt/keyrings/docker.asc
echo "deb [arch=$(dpkg --print-architecture) signed-by=/etc/apt/keyrings/docker.asc] https://download.docker.com/linux/ubuntu $(. /etc/os-release && echo "$VERSION_CODENAME") stable" | tee /etc/apt/sources.list.d/docker.list > /dev/null

# packets traversing the bridge are processed by iptables for filtering
echo 1 > /proc/sys/net/ipv4/ip_forward
echo "net.ipv4.ip_forward = 1" >> /etc/sysctl.d/k8s.conf

# enable br_netfilter for iptables
modprobe br_netfilter
modprobe overlay
echo "br_netfilter" >> /etc/modules-load.d/k8s.conf
echo "overlay" >> /etc/modules-load.d/k8s.conf


echo "[TASK 5] Install Kubernetes components (kubeadm, kubelet and kubectl)"
# Update the apt package index, install kubelet, kubeadm and kubectl, and pin their version
apt update >/dev/null 2>&1

# apt list -a kubelet ; apt list -a containerd.io
apt-get install -y kubelet=$1 kubectl=$1 kubeadm=$1 containerd.io=$2 >/dev/null 2>&1
apt-mark hold kubelet kubeadm kubectl >/dev/null 2>&1

# containerd configure to default and cgroup managed by systemd
containerd config default > /etc/containerd/config.toml
sed -i 's/SystemdCgroup = false/SystemdCgroup = true/g' /etc/containerd/config.toml

# avoid WARN&ERRO(default endpoints) when crictl run
cat <<EOF > /etc/crictl.yaml
runtime-endpoint: unix:///run/containerd/containerd.sock
image-endpoint: unix:///run/containerd/containerd.sock
EOF

# ready to install for k8s
systemctl restart containerd && systemctl enable containerd
systemctl enable --now kubelet


echo "[TASK 6] Install Packages & Helm"
apt-get install -y bridge-utils sshpass net-tools conntrack ngrep tcpdump ipset arping wireguard jq tree bash-completion unzip kubecolor >/dev/null 2>&1
curl -s https://raw.githubusercontent.com/helm/helm/master/scripts/get-helm-3 | bash >/dev/null 2>&1


echo ">>>> Initial Config End <<<<"
3.3. k8s-ctr.sh
alias, PS1 설정, 자동완성 설정 등이 포함된 Control Plane 설정 Script입니다.
1
2
3
4
5
6
7
8
9
10
11
12
13
14
15
16
17
18
19
20
21
22
23
24
25
26
27
28
29
30
31
32
33
34
35
36
37
38
39
40
41
42
43
44
45
46
47
48
49
50
51
52
#!/usr/bin/env bash

echo ">>>> Kubernetes Controlplane config Start <<<<"

echo "[TASK 1] Initial Kubernetes"
kubeadm init --token 123456.1234567890123456 --token-ttl 0 --pod-network-cidr=10.244.0.0/16 --service-cidr=10.96.0.0/16 --apiserver-advertise-address=192.168.10.100 --cri-socket=unix:///run/containerd/containerd.sock >/dev/null 2>&1


echo "[TASK 2] Setting kube config file"
mkdir -p /root/.kube
cp -i /etc/kubernetes/admin.conf /root/.kube/config
chown $(id -u):$(id -g) /root/.kube/config


echo "[TASK 3] Source the completion"
echo 'source <(kubectl completion bash)' >> /etc/profile
echo 'source <(kubeadm completion bash)' >> /etc/profile


echo "[TASK 4] Alias kubectl to k"
echo 'alias k=kubectl' >> /etc/profile
echo 'alias kc=kubecolor' >> /etc/profile
echo 'complete -F __start_kubectl k' >> /etc/profile


echo "[TASK 5] Install Kubectx & Kubens"
git clone https://github.com/ahmetb/kubectx /opt/kubectx >/dev/null 2>&1
ln -s /opt/kubectx/kubens /usr/local/bin/kubens
ln -s /opt/kubectx/kubectx /usr/local/bin/kubectx


echo "[TASK 6] Install Kubeps & Setting PS1"
git clone https://github.com/jonmosco/kube-ps1.git /root/kube-ps1 >/dev/null 2>&1
cat <<"EOT" >> /root/.bash_profile
source /root/kube-ps1/kube-ps1.sh
KUBE_PS1_SYMBOL_ENABLE=true
function get_cluster_short() {
  echo "$1" | cut -d . -f1
}
KUBE_PS1_CLUSTER_FUNCTION=get_cluster_short
KUBE_PS1_SUFFIX=') '
PS1='$(kube_ps1)'$PS1
EOT
kubectl config rename-context "kubernetes-admin@kubernetes" "HomeLab" >/dev/null 2>&1


echo "[TASK 6] Install Kubeps & Setting PS1"
echo "192.168.10.100 cilium-m1" >> /etc/hosts
for (( i=1; i<=$1; i++  )); do echo "192.168.10.10$i cilium-w$i" >> /etc/hosts; done


echo ">>>> Kubernetes Controlplane Config End <<<<"
3.4. k8s-w.sh
Data Plane의 노드들이 Control Plane에 조인하는 Script입니다.
1
2
3
4
5
6
7
8
9
#!/usr/bin/env bash

echo ">>>> Kubernetes Node config Start <<<<"

echo "[TASK 1] Kubernetes Controlplane Join"
kubeadm join --token 123456.1234567890123456 --discovery-token-unsafe-skip-ca-verification 192.168.10.100:6443  >/dev/null 2>&1


echo ">>>> Kubernetes Node config End <<<<"
4. Kubernetes Cluster 배포
위에서 작성한 Vagrantfile, Init Script가 존재하는 디렉토리에서 vagrant up를 사용해 Kubernetes Cluster를 배포합니다.
1
2
3
4
5
6
7
8
9
10
11
12
13
14
15
16
17
18
19
20
21
22
23
24
25
26
PS C:\Code\cilium-lab\vagrant> ls

    Directory: C:\Code\cilium-lab\vagrant

Mode                 LastWriteTime         Length Name
----                 -------------         ------ ----
da---     2025-07-15 화 오전 12:18                .vagrant
da---     2025-07-15 화 오전 11:10                .vagrant.d
-a---     2025-07-13 일  오후 8:31           3033 init_cfg.sh
-a---     2025-07-15 화 오전 11:53           1722 k8s-ctr.sh
-a---     2025-07-15 화  오전 1:29            266 k8s-w.sh
-a---     2025-07-15 화 오후 12:15           2325 Vagrantfile

PS C:\Code\cilium-lab\vagrant> vagrant up
Bringing machine 'cilium-m1' up with 'virtualbox' provider...
Bringing machine 'cilium-w1' up with 'virtualbox' provider...
Bringing machine 'cilium-w2' up with 'virtualbox' provider...
==> cilium-m1: Cloning VM...
==> cilium-m1: Matching MAC address for NAT networking...
==> cilium-m1: Checking if box 'bento/ubuntu-24.04' version '202502.21.0' is up to date...
==> cilium-m1: Setting the name of the VM: cilium-m1
...
...
    cilium-w2: >>>> Kubernetes Node config Start <<<<
    cilium-w2: [TASK 1] Kubernetes Controlplane Join
    cilium-w2: >>>> Kubernetes Node config End <<<<
5. 배포 확인
Vagrant로 생성한 VM의 eth0은 모두 10.0.2.15 로 모두 동일하며, 외부 인터넷 연결 역할을 합니다.
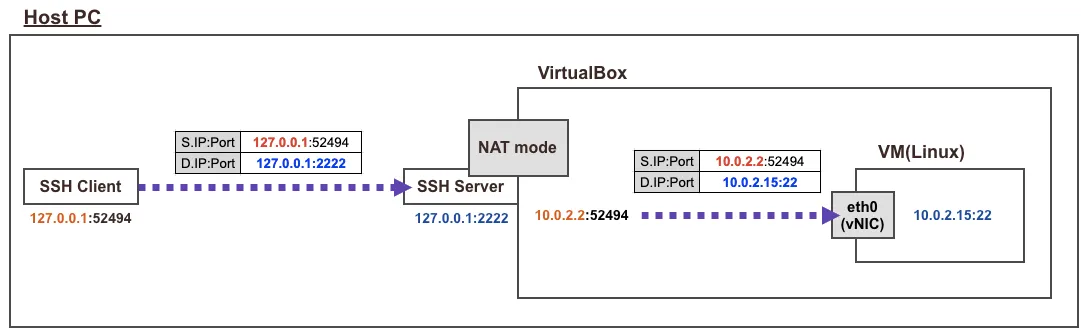
- vagrant ssh 접속 시 호스트에 127.0.0.1(2222)를 목적지로 접속 -> 이후 포트포워딩(S/DNAT)을 통해서 내부에 VM로 SSH 연결
- NAT Mode 에 10.0.2.2(GateWay), 10.0.2.3(DNS Server), 10.0.2.4(TFTP Server) 용도로 IP 예약
5.1. Vagrant, VirtualBox 세팅 확인
1
2
3
4
5
6
7
8
9
10
11
12
13
14
15
16
17
18
19
20
21
22
23
24
25
26
############################
## VM Status 확인
############################
PS C:\Code\cilium-lab\vagrant> vagrant status
Current machine states:

cilium-m1                 running (virtualbox)
cilium-w1                 running (virtualbox)
cilium-w2                 running (virtualbox)

############################
## Port-Forward 확인 (Control Plane)
############################
PS C:\Code\cilium-lab\vagrant> vagrant port cilium-1
The forwarded ports for the machine are listed below. Please note that
these values may differ from values configured in the Vagrantfile if the
provider supports automatic port collision detection and resolution.

  6443 (guest) => 56444 (host)
    22 (guest) => 60000 (host)

############################
## 접속해보기
############################
PS C:\Code\cilium-lab\vagrant>vagrant ssh cilium-m1
(⎈|HomeLab:N/A) root@cilium-m1:~#
5.2. VM Network 설정 확인
1
2
3
4
5
6
7
8
9
10
11
12
13
14
15
16
17
18
19
20
21
22
23
24
25
26
27
28
29
30
31
32
33
34
35
36
37
38
39
40
41
42
43
44
45
46
47
48
49
50
51
52
53
54
55
56
57
58
59
60
61
62
63
64
65
66
67
68
69
70
71
72
73
74
############################
## /etc/hosts 확인
############################
(⎈|HomeLab:N/A) root@cilium-m1:~# cat /etc/hosts
127.0.0.1 localhost
127.0.1.1 vagrant

############################
## NIC 정보 확인
############################
(⎈|HomeLab:N/A) root@cilium-m1:~# ifconfig | grep -iEA1 'eth[0-9]:'
eth0: flags=4163<UP,BROADCAST,RUNNING,MULTICAST>  mtu 1500
        inet 10.0.2.15  netmask 255.255.255.0  broadcast 10.0.2.255
--
eth1: flags=4163<UP,BROADCAST,RUNNING,MULTICAST>  mtu 1500
        inet 192.168.10.100  netmask 255.255.255.0  broadcast 192.168.10.255

############################
## default Routing 정보 확인
############################
(⎈|HomeLab:N/A) root@cilium-m1:~# ip -c route
default via 10.0.2.2 dev eth0 proto dhcp src 10.0.2.15 metric 100
10.0.2.0/24 dev eth0 proto kernel scope link src 10.0.2.15 metric 100
10.0.2.2 dev eth0 proto dhcp scope link src 10.0.2.15 metric 100
10.0.2.3 dev eth0 proto dhcp scope link src 10.0.2.15 metric 100
192.168.10.0/24 dev eth1 proto kernel scope link src 192.168.10.100


# The following lines are desirable for IPv6 capable hosts
::1     ip6-localhost ip6-loopback
fe00::0 ip6-localnet
ff00::0 ip6-mcastprefix
ff02::1 ip6-allnodes
ff02::2 ip6-allrouters
127.0.2.1 cilium-m1 cilium-m1
192.168.10.100 cilium-m1
192.168.10.101 cilium-w1
192.168.10.102 cilium-w2

############################
## dns 서버 정보 확인 (10.0.2.3)
############################
(⎈|HomeLab:N/A) root@cilium-m1:~# resolvectl
Global
         Protocols: -LLMNR -mDNS -DNSOverTLS DNSSEC=no/unsupported
  resolv.conf mode: stub

Link 2 (eth0)
    Current Scopes: DNS
         Protocols: +DefaultRoute -LLMNR -mDNS -DNSOverTLS DNSSEC=no/unsupported
Current DNS Server: 10.0.2.3
       DNS Servers: 10.0.2.3

Link 3 (eth1)
    Current Scopes: none
         Protocols: -DefaultRoute -LLMNR -mDNS -DNSOverTLS DNSSEC=no/unsupported

############################
## ping test
############################
(⎈|HomeLab:N/A) root@cilium-m1:~# ping -c 1 cilium-w1
PING cilium-w1 (192.168.10.101) 56(84) bytes of data.
64 bytes from cilium-w1 (192.168.10.101): icmp_seq=1 ttl=64 time=0.608 ms

--- cilium-w1 ping statistics ---
1 packets transmitted, 1 received, 0% packet loss, time 0ms
rtt min/avg/max/mdev = 0.608/0.608/0.608/0.000 ms
(⎈|HomeLab:N/A) root@cilium-m1:~# ping -c 1 cilium-w2
PING cilium-w2 (192.168.10.102) 56(84) bytes of data.
64 bytes from cilium-w2 (192.168.10.102): icmp_seq=1 ttl=64 time=0.772 ms

--- cilium-w2 ping statistics ---
1 packets transmitted, 1 received, 0% packet loss, time 0ms
rtt min/avg/max/mdev = 0.772/0.772/0.772/0.000 ms
5.3. kubernetes 정보 확인
1
2
3
4
5
6
7
8
9
10
11
12
13
14
15
16
17
############################
## Node Status (CNI 미설치로 NotReady)
############################
(⎈|HomeLab:N/A) root@cilium-m1:~# k get no -o wide
NAME        STATUS     ROLES           AGE   VERSION   INTERNAL-IP      EXTERNAL-IP   OS-IMAGE             KERNEL-VERSION     CONTAINER-RUNTIME
cilium-m1   NotReady   control-plane   25h   v1.33.2   192.168.10.100   <none>        Ubuntu 24.04.2 LTS   6.8.0-53-generic   containerd://1.7.27
cilium-w1   NotReady   <none>          25h   v1.33.2   10.0.2.15        <none>        Ubuntu 24.04.2 LTS   6.8.0-53-generic   containerd://1.7.27
cilium-w2   NotReady   <none>          25h   v1.33.2   10.0.2.15        <none>        Ubuntu 24.04.2 LTS   6.8.0-53-generic   containerd://1.7.27

############################
## Cluster-Info
############################
(⎈|HomeLab:N/A) root@cilium-m1:~# k cluster-info
Kubernetes control plane is running at https://192.168.10.100:6443
CoreDNS is running at https://192.168.10.100:6443/api/v1/namespaces/kube-system/services/kube-dns:dns/proxy

To further debug and diagnose cluster problems, use 'kubectl cluster-info dump'.
현재는 CNI(Container Network Interface)가 설치되지 않았기 때문에 모든 노드가
NotReady상태로 나타납니다. 이후의 포스트에서 CNI(Cilium)를 설치하고 나면 정상적으로 Ready 상태로 전환됩니다.
{. prompt-tip}
6. INTERNAL-IP 설정 변경
위에서 확인한 대로, cilium-m1 VM은 INTERNAL-IP가 정상적으로 192.168.10.100으로 되어있지만 cilium-w1, cilium-w2 VM은 eth0번 IP인 10.0.2.15를 갖고 있습니다. 이는 kubelet이 노드의 INTERNAL-IP로 기본적으로 Routing Table에서 default gateway가 연결된 Interface IP를 선택하기 때문입니다. 현재 구성에서는 eth0(NAT 인터페이스)가 default route로 설정되어 있기 때문에, 의도하지 않은 10.0.2.15가 INTERNAL-IP로 설정된 것입니다. 이러한 문제를 방지하기 위해서는 JoinConfiguration 파일을 사용해 해당 설정 파일에 node ip를 명시적으로 설정한 뒤, kubeadm join --config {join_configuration_file.yaml} 명령을 통해 Join 하는 방법을 사용할 수 있습니다.
예시) https://github.com/KKamJi98/cilium-lab/blob/main/vagrant-advanced/k8s-w.sh
- https://github.com/KKamJi98/cilium-lab/blob/main/vagrant-advanced/configurations/join-configuration.yaml
- https://github.com/KKamJi98/cilium-lab/blob/main/vagrant-advanced/k8s-w.sh
추가) cilium-m1 노드의 INTERNAL_IP가 정상인 이유는 kubeadm init 명령어의 --apiserver-advertise-address=192.168.10.100을 지정해주었기 때문입니다.
The IP address the API Server will advertise it’s listening on. If not set the default network interface will be used.
https://kubernetes.io/docs/reference/setup-tools/kubeadm/kubeadm-init
INTERNAL-IP를 제대로 설정해주기 위해 아래와 같은 절차를 cilium-m1, cilium-w1, cilium-w2에서 진행해 줍니다. /var/lib/kubelet/kubeadm-flags.env 파일은 kubeadm이 생성한 kubelet 서비스의 실행 옵션이 포함된 환경변수 파일입니다. 이 파일을 직접 수정하여 kubelet의 옵션을 추가할 수 있습니다.
1
2
3
4
5
6
7
8
9
10
PS C:\Code\cilium-lab\vagrant> vagrant ssh cilium-m1
(⎈|HomeLab:N/A) root@cilium-m1:~# cat /var/lib/kubelet/kubeadm-flags.env
KUBELET_KUBEADM_ARGS="--container-runtime-endpoint=unix:///run/containerd/containerd.sock --pod-infra-container-image=registry.k8s.io/pause:3.10"
(⎈|HomeLab:N/A) root@cilium-m1:~# NODEIP=$(ip -4 addr show eth1 | grep -oP '(?<=inet\s)\d+(\.\d+){3}')
(⎈|HomeLab:N/A) root@cilium-m1:~# sed -i "s/^\(KUBELET_KUBEADM_ARGS=\"\)/\1--node-ip=${NODEIP} /" /var/lib/kubelet/kubeadm-flags.env
(⎈|HomeLab:N/A) root@cilium-m1:~# systemctl daemon-reexec && systemctl restart kubelet
(⎈|HomeLab:N/A) root@cilium-m1:~# cat /var/lib/kubelet/kubeadm-flags.env
KUBELET_KUBEADM_ARGS="--node-ip=192.168.10.100 --container-runtime-endpoint=unix:///run/containerd/containerd.sock --pod-infra-container-image=registry.k8s.io/pause:3.10"

## cilium-w1, cilium-w2에서도 반복
6.1. INTERNAL-IP 설정 변경 확인
1
2
3
4
5
6
7
8
9
10
11
12
13
14
15
16
17
⎈|HomeLab:N/A) root@cilium-m1:~# k get no -o wide
NAME        STATUS     ROLES           AGE     VERSION   INTERNAL-IP      EXTERNAL-IP   OS-IMAGE             KERNEL-VERSION     CONTAINER-RUNTIME
cilium-m1   NotReady   control-plane   7m48s   v1.33.2   192.168.10.100   <none>        Ubuntu 24.04.2 LTS   6.8.0-53-generic   containerd://1.7.27
cilium-w1   NotReady   <none>          5m51s   v1.33.2   192.168.10.101   <none>        Ubuntu 24.04.2 LTS   6.8.0-53-generic   containerd://1.7.27
cilium-w2   NotReady   <none>          3m54s   v1.33.2   192.168.10.102   <none>        Ubuntu 24.04.2 LTS   6.8.0-53-generic   containerd://1.7.27

(⎈|HomeLab:N/A) root@cilium-m1:~# k get po -A -o wide
NAMESPACE     NAME                                READY   STATUS    RESTARTS       AGE     IP               NODE        NOMINATED NODE   READINESS GATES
kube-system   coredns-674b8bbfcf-fnmww            0/1     Pending   0              13m     <none>           <none>      <none>           <none>
kube-system   coredns-674b8bbfcf-kc4d2            0/1     Pending   0              13m     <none>           <none>      <none>           <none>
kube-system   etcd-cilium-m1                      0/1     Running   0              13m     192.168.10.100   cilium-m1   <none>           <none>
kube-system   kube-apiserver-cilium-m1            0/1     Running   0              13m     192.168.10.100   cilium-m1   <none>           <none>
kube-system   kube-controller-manager-cilium-m1   0/1     Running   0              13m     192.168.10.100   cilium-m1   <none>           <none>
kube-system   kube-proxy-jc6xq                    1/1     Running   0              9m20s   192.168.10.102   cilium-w2   <none>           <none>
kube-system   kube-proxy-kt5kh                    1/1     Running   0              13m     192.168.10.100   cilium-m1   <none>           <none>
kube-system   kube-proxy-q47r5                    1/1     Running   0              11m     192.168.10.101   cilium-w1   <none>           <none>
kube-system   kube-scheduler-cilium-m1            1/1     Running   0              13m     192.168.10.100   cilium-m1   <none>           <none>
7. 편의성 세팅 (Windows + WSL 환경)
Windows 환경에서 WSL을 사용하는 경우, Vagrant로 생성된 VM에 vagrant ssh 대신 직접 SSH로 접속할 수 있도록 다음과 같은 SSH 설정을 하면 보다 편리하게 관리할 수 있습니다. 이를 통해 WSL 터미널에서도 손쉽게 VM에 접근 가능합니다.
1
2
3
4
5
6
7
8
9
10
11
12
13
14
15
16
17
18
19
20
21
22
23
24
25
26
27
28
29
30
31
32
33
34
35
36
37
38
39
40
41
42
43
44
45
46
47
48
49
50
51
52
53
54
55
56
57
58
59
60
61
62
63
64
65
66
67
68
69
70
71
72
73
74
75
76
77
78
79
80
81
82
83
84
85
86
87
88
89
90
91
92
93
94
95
96
97
98
99
100
101
102
103
104
105
106
107
108
109
110
############################
## VM ssh 설정 확인 (각 VM의 IdentityFile이 동일한 것을 확인)
############################
## config.ssh.insert_key = false # 해당 설정의 영향 해당 값이 true 이면 각 VM마다 다른 Key-Pair 생성
PS C:\Code\cilium-lab\vagrant> vagrant ssh-config
Host cilium-m1
  HostName 127.0.0.1
  User vagrant
  Port 60000
  UserKnownHostsFile /dev/null
  StrictHostKeyChecking no
  PasswordAuthentication no
  IdentityFile C:/Users/KKamJi/.vagrant.d/insecure_private_keys/vagrant.key.ed25519
  IdentityFile C:/Users/KKamJi/.vagrant.d/insecure_private_keys/vagrant.key.rsa
  IdentitiesOnly yes
  LogLevel FATAL
  PubkeyAcceptedKeyTypes +ssh-rsa
  HostKeyAlgorithms +ssh-rsa

Host cilium-w1
  HostName 127.0.0.1
  User vagrant
  Port 60001
  UserKnownHostsFile /dev/null
  StrictHostKeyChecking no
  PasswordAuthentication no
  IdentityFile C:/Users/KKamJi/.vagrant.d/insecure_private_keys/vagrant.key.ed25519
  IdentityFile C:/Users/KKamJi/.vagrant.d/insecure_private_keys/vagrant.key.rsa
  IdentitiesOnly yes
  LogLevel FATAL
  PubkeyAcceptedKeyTypes +ssh-rsa
  HostKeyAlgorithms +ssh-rsa

Host cilium-w2
  HostName 127.0.0.1
  User vagrant
  Port 60002
  UserKnownHostsFile /dev/null
  StrictHostKeyChecking no
  PasswordAuthentication no
  IdentityFile C:/Users/Oxi/.vagrant.d/insecure_private_keys/vagrant.key.ed25519
  IdentityFile C:/Users/Oxi/.vagrant.d/insecure_private_keys/vagrant.key.rsa
  IdentitiesOnly yes
  LogLevel FATAL
  PubkeyAcceptedKeyTypes +ssh-rsa
  HostKeyAlgorithms +ssh-rsa

############################
## key-pair를 가져올 directory 생성 (In WSL)
############################
❯ mkdir -p ~/.ssh/keys
############################
## key-pair 가져오기
############################
❯ cp /mnt/c/Users/Oxi/.vagrant.d/insecure_private_keys/vagrant.key.ed25519 ~/.ssh/keys
❯ cp /mnt/c/Users/Oxi/.vagrant.d/insecure_private_keys/vagrant.key.rsa ~/.ssh/keys
############################
# 권한 설정
############################
❯ chmod 600 ~/.ssh/keys/*

############################
## 위에서 확인한 호스트 ssh 설정을 WSL 환경으로 ~/.ssh/config 에 포함시키기
############################
# ssh-config 가져오기
# HostName을 Windows Machine의 Internal-IP로 수정, IdentityFile의 경로를 WSL 환경의 경로로 수정
# WSL의 `localhostForwarding` 기능을 사용하는 경우 HostName을 `localhost`로 유지 해도 됩
❯ vim ~/.ssh/config
## Vagrant
Host cilium-m1
    HostName 192.168.0.2
    User vagrant
    Port 60000
    UserKnownHostsFile /dev/null
    StrictHostKeyChecking no
    PasswordAuthentication no
    IdentityFile ~/.ssh/keys/vagrant.key.ed25519
    IdentityFile ~/.ssh/keys/vagrant.key.rsa
    IdentitiesOnly yes
    LogLevel FATAL
    PubkeyAcceptedKeyTypes +ssh-rsa
    HostKeyAlgorithms +ssh-rsa

Host cilium-w1
    HostName 192.168.0.2
    User vagrant
    Port 60001
    UserKnownHostsFile /dev/null
    StrictHostKeyChecking no
    PasswordAuthentication no
    IdentityFile ~/.ssh/keys/vagrant.key.ed25519
    IdentityFile ~/.ssh/keys/vagrant.key.rsa
    IdentitiesOnly yes
    LogLevel FATAL
    PubkeyAcceptedKeyTypes +ssh-rsa
    HostKeyAlgorithms +ssh-rsa

Host cilium-w2
    HostName 192.168.0.2
    User vagrant
    Port 60002
    UserKnownHostsFile /dev/null
    StrictHostKeyChecking no
    PasswordAuthentication no
    IdentityFile ~/.ssh/keys/vagrant.key.ed25519
    IdentityFile ~/.ssh/keys/vagrant.key.rsa
    IdentitiesOnly yes
    LogLevel FATAL
    PubkeyAcceptedKeyTypes +ssh-rsa
    HostKeyAlgorithms +ssh-rsa
7.1. 편의성 세팅 확인
1
2
3
4
5
6
7
8
9
10
11
12
13
14
15
16
17
18
19
20
21
22
23
24
25
26
27
28
29
30
31
32
33
34
35
36
37
38
39
40
41
42
43
44
45
46
47
48
49
50
51
52
53
############################
## ssh 접속
############################
❯ ssh cilium-m1
Welcome to Ubuntu 24.04.2 LTS (GNU/Linux 6.8.0-53-generic x86_64)

 * Documentation:  https://help.ubuntu.com
 * Management:     https://landscape.canonical.com
 * Support:        https://ubuntu.com/pro

 System information as of Wed Jul 16 01:50:24 PM KST 2025

  System load:           0.14
  Usage of /:            20.0% of 30.34GB
  Memory usage:          31%
  Swap usage:            0%
  Processes:             165
  Users logged in:       1
  IPv4 address for eth0: 10.0.2.15
  IPv6 address for eth0: fd17:625c:f037:2:a00:27ff:fe6b:69c9


This system is built by the Bento project by Chef Software
More information can be found at https://github.com/chef/bento

Use of this system is acceptance of the OS vendor EULA and License Agreements.
Last login: Wed Jul 16 13:43:40 2025 from 192.168.0.2
(⎈|HomeLab:N/A) root@cilium-m1:~# exit
logout
vagrant@cilium-m1:~$ exit
logout

############################
## NIC 확인
############################
❯ for i in m1 w1 w2 ; do echo ">> node : cilium-$i <<"; ssh cilium-$i 'ip -c -4 addr show dev eth0'; echo; done
>> node : cilium-m1 <<
2: eth0: <BROADCAST,MULTICAST,UP,LOWER_UP> mtu 1500 qdisc fq_codel state UP group default qlen 1000
    altname enp0s3
    inet 10.0.2.15/24 metric 100 brd 10.0.2.255 scope global dynamic eth0
       valid_lft 83117sec preferred_lft 83117sec

>> node : cilium-w1 <<
2: eth0: <BROADCAST,MULTICAST,UP,LOWER_UP> mtu 1500 qdisc fq_codel state UP group default qlen 1000
    altname enp0s3
    inet 10.0.2.15/24 metric 100 brd 10.0.2.255 scope global dynamic eth0
       valid_lft 69269sec preferred_lft 69269sec

>> node : cilium-w2 <<
2: eth0: <BROADCAST,MULTICAST,UP,LOWER_UP> mtu 1500 qdisc fq_codel state UP group default qlen 1000
    altname enp0s3
    inet 10.0.2.15/24 metric 100 brd 10.0.2.255 scope global dynamic eth0
       valid_lft 69362sec preferred_lft 69362sec
8. 마무리
현재 스크립트 기반으로 kubeadm 명령어를 사용해 클러스터를 구성하고 있지만, 실제 운영 환경이나 지속 가능한 관리 환경에서는 kubeadm의 설정을 YAML 파일로 관리하는 것이 좋습니다. YAML로 관리하면 버전 관리 및 설정의 명확한 관리가 가능하며, 추후 클러스터의 변경 및 확장도 더욱 쉽게 할 수 있습니다.
9. Reference
- Kubernetes Docs - kubeadm docs
- Kubernetes Docs - kubeadm init docs
- Kubernetes Docs - kubeadm configuration(v1beta4)
- VirtualBox - VirtualBox 설치
- HashiCorp Docs - Vagrant 설치
- HashiCorp - vagrant box ubuntu image
- HashiCorp - vagrant box rockylinux image
궁금하신 점이나 추가해야 할 부분은 댓글이나 아래의 링크를 통해 문의해주세요.
Written with KKamJi